User guides · For J Solutions employees and new hires
Employee guide
How to complete your new-hire paperwork, sign in, find your pay stubs and W-2s, and update your W-4 or direct deposit. The portal works in English and Spanish. Every screen here is the real portal, shown with fictional demo data.
All 30 steps
New hires · Step 1 of 30
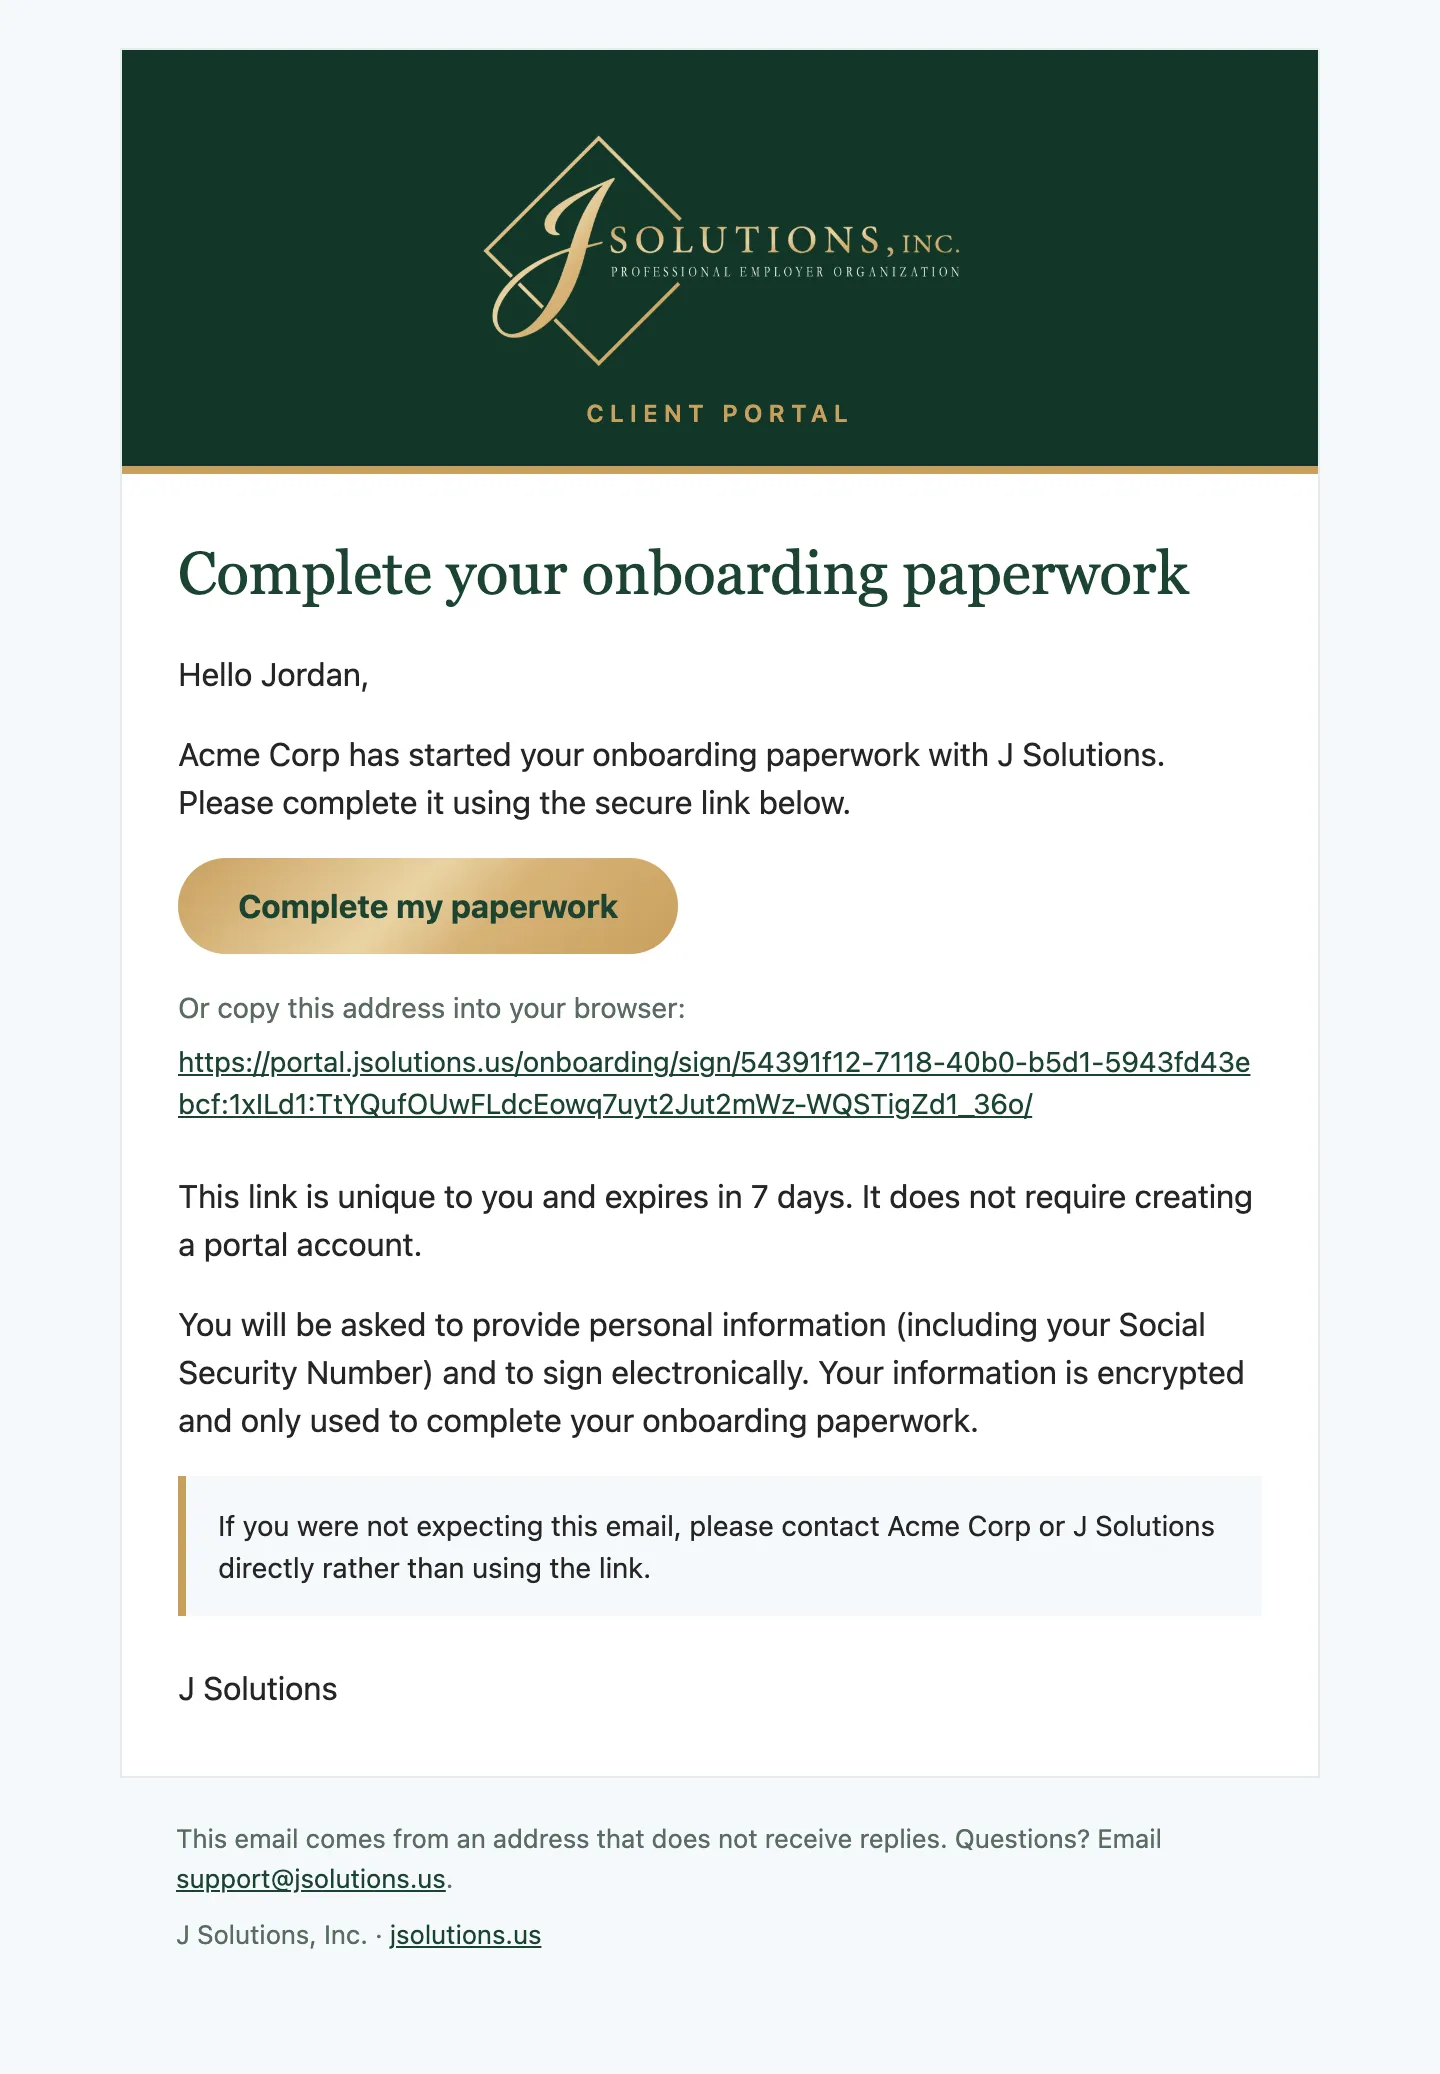
Your onboarding email
When you are hired, J Solutions emails you a secure link to your paperwork, in English or Spanish.
- Click Complete my paperwork. You do not need a portal account for this.
- The link is yours alone and expires after 7 days. If it expired, ask your employer or J Solutions for a new one.
- Not expecting it? Contact your employer or J Solutions directly instead of clicking.
New hires · Step 2 of 30
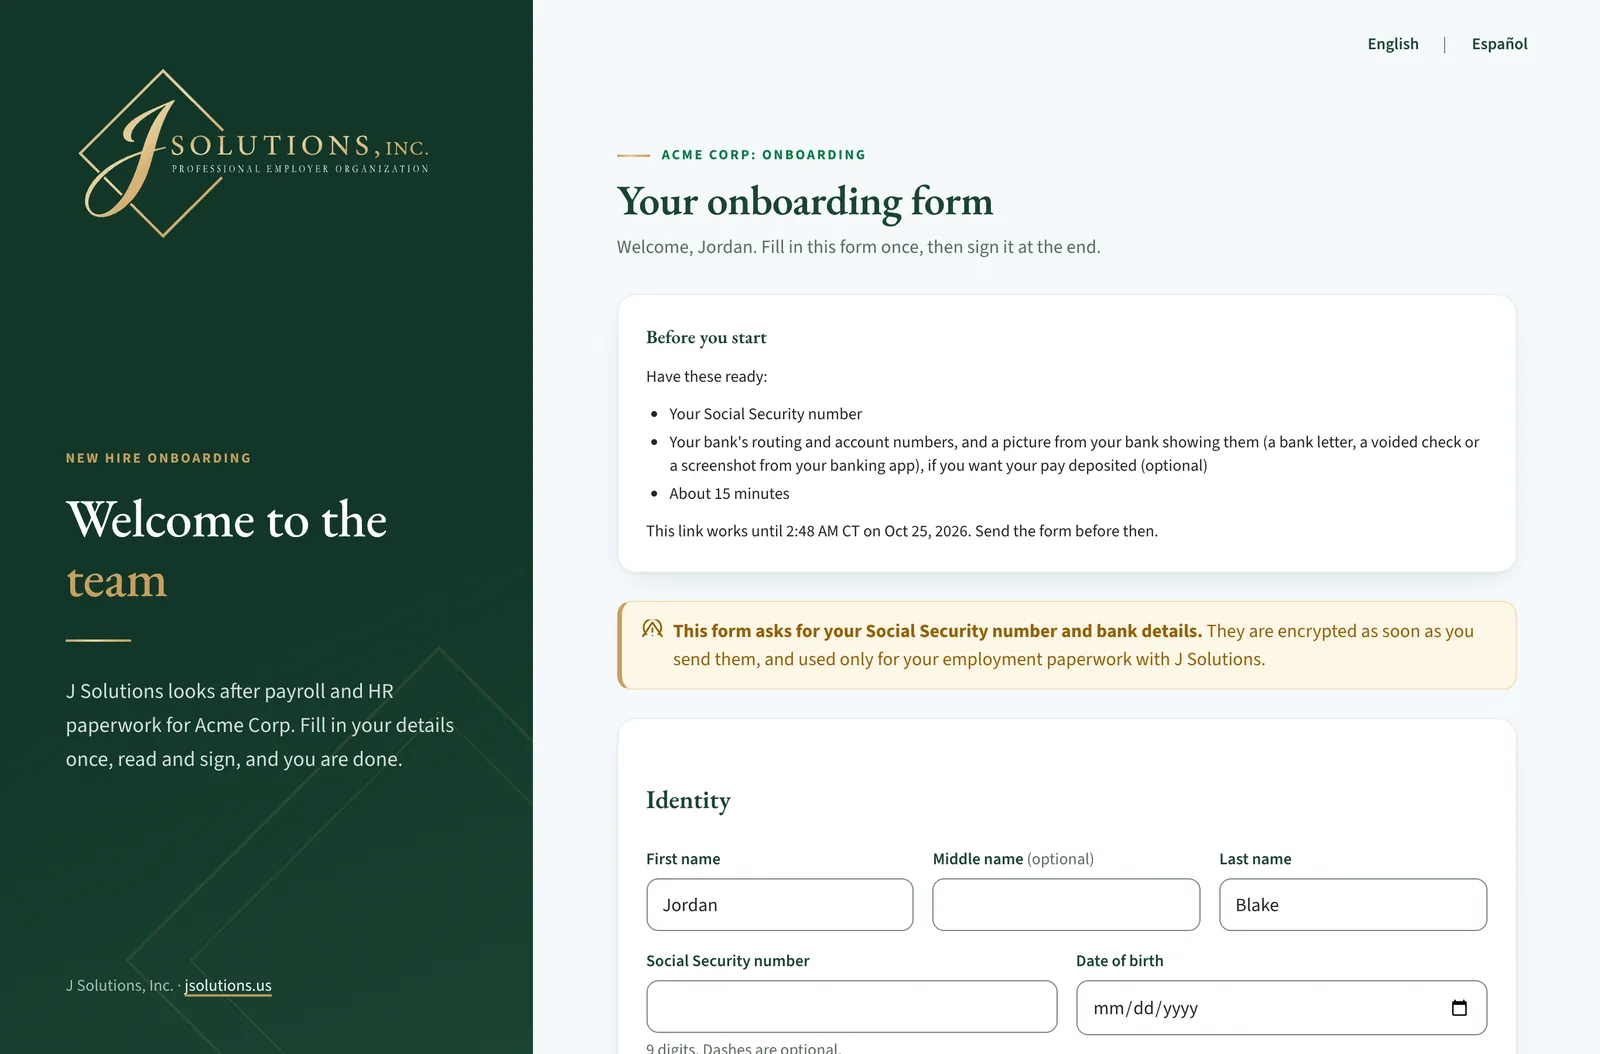
Fill in your answers
Your onboarding form collects what J Solutions needs to pay you. Before you start lists what to have ready: your Social Security number, and your bank details if you want direct deposit. It takes about 15 minutes, and the page says until when your link works.
- Use the English / Español switch at the top to change the form's language.
- Fill in Identity and Contact and address. Your cell phone number and an emergency contact with their phone are required.
- Answer the Personnel record questions: whether you may work in the United States, whether you are 18 or over, and the question about a felony.
Good to know: If something needs fixing, a box headed There is a problem at the top lists it. For your security, a few numbers, such as your Social Security number, are not shown again: the box says which ones to type again. Your other answers are kept.
New hires · Step 3 of 30
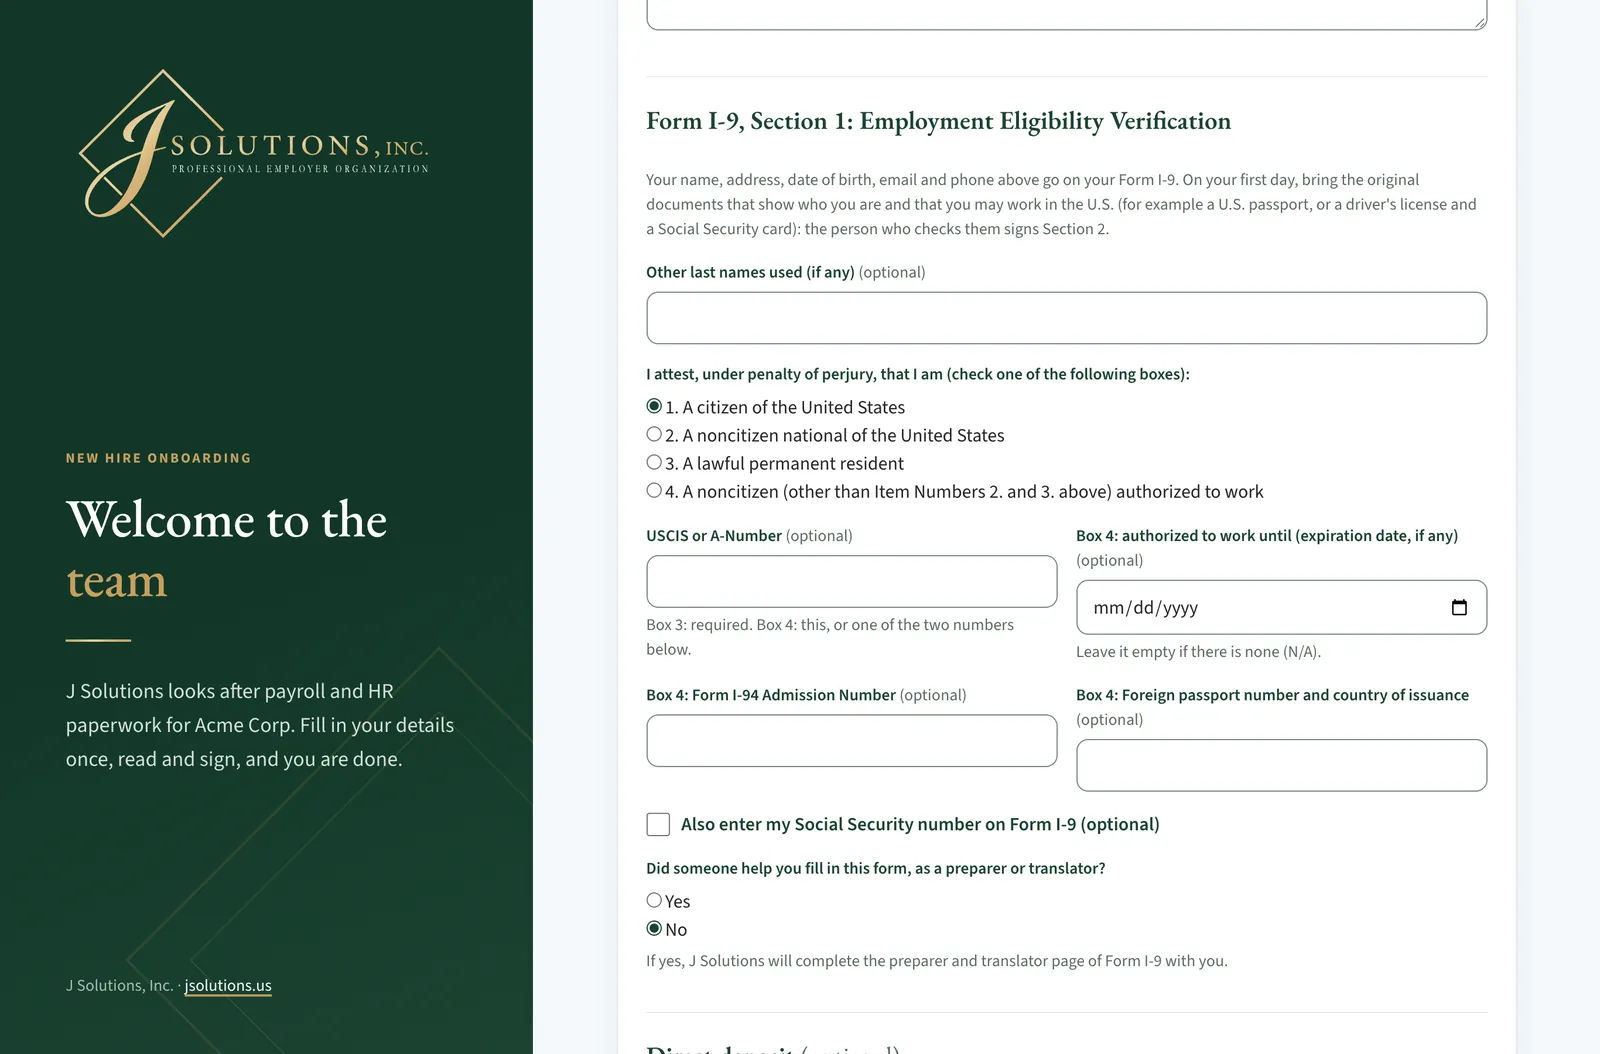
Form I-9, Section 1
Form I-9, Section 1: Employment Eligibility Verification uses the form's own words. Your name, address, date of birth, email and phone from above go on it.
- Check the one box that describes you: a U.S. citizen, a noncitizen national, a lawful permanent resident, or a noncitizen authorized to work. Boxes 3 and 4 ask for a USCIS or A-Number, or another number the form allows.
- Fill in Other last names used (if any), and answer whether someone helped you fill in the form.
- On your first day, bring the original documents that show who you are and that you may work in the U.S. The person who checks them signs Section 2.
New hires · Step 4 of 30
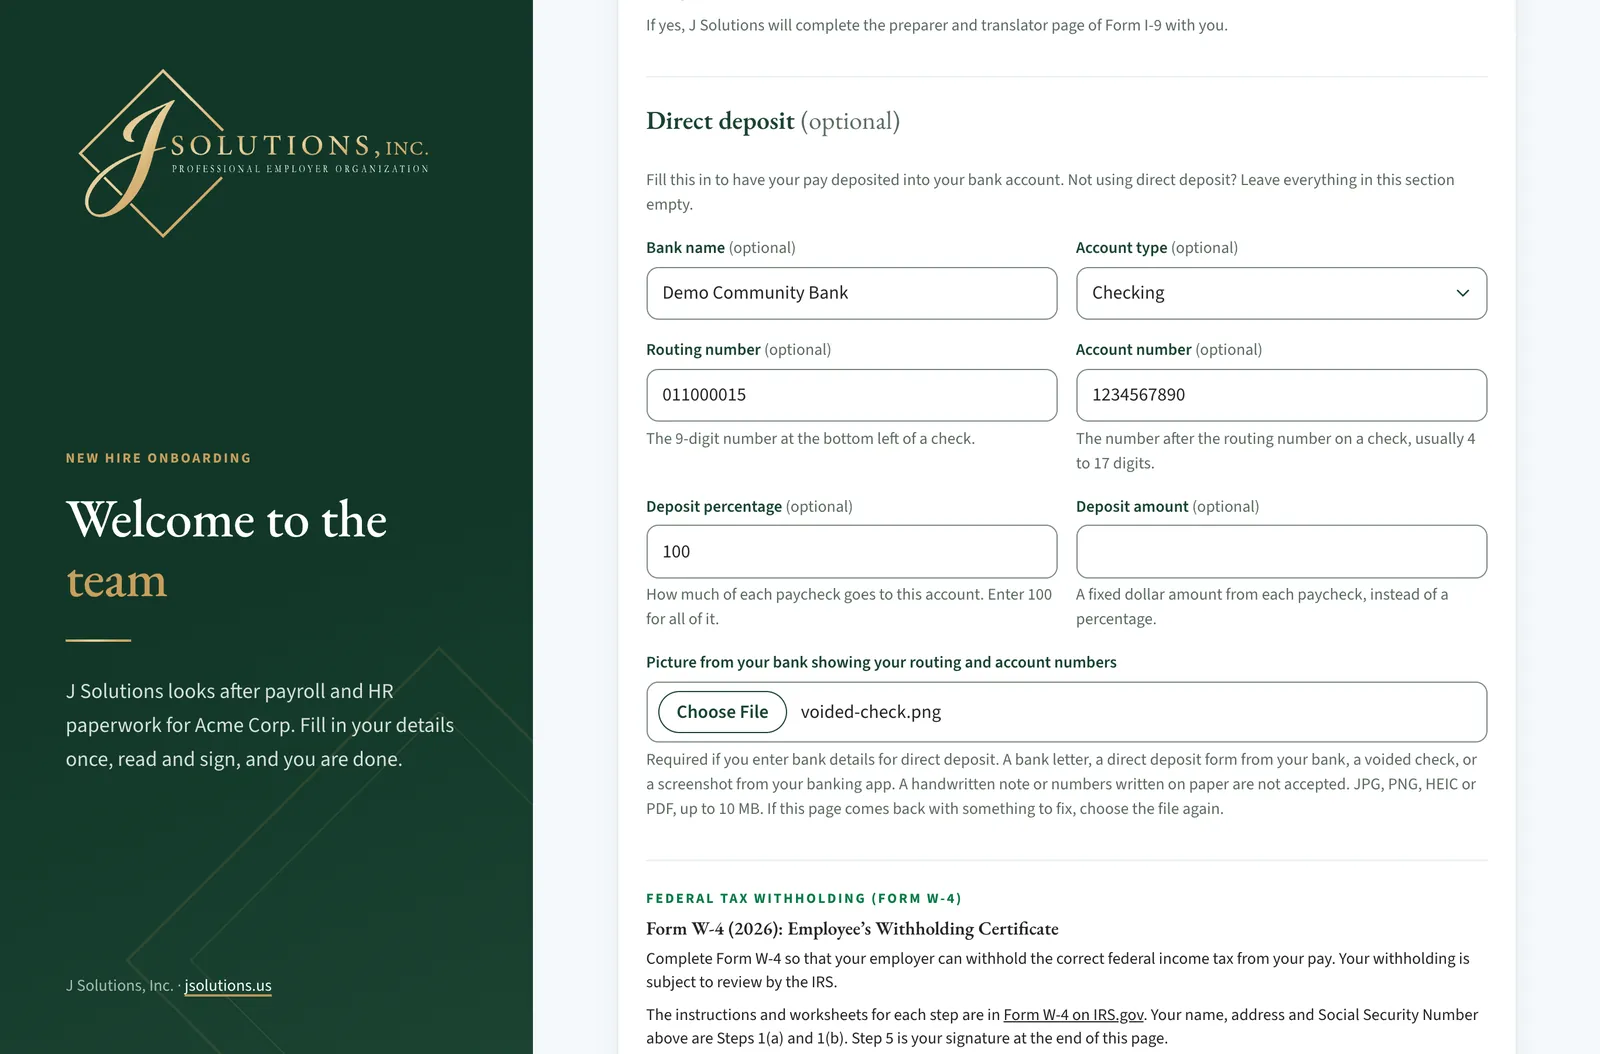
Direct deposit
Direct deposit is optional. Fill it in to have your pay deposited into your bank account. Not using direct deposit? Leave everything in this section empty.
- Enter your Bank name, Account type, Routing number and Account number.
- Enter a Deposit percentage (100 for all of it) or a fixed Deposit amount from each paycheck.
- Add a picture from your bank that shows your routing and account numbers: a bank letter, a direct deposit form from your bank, a voided check or a screenshot from your banking app. It is required with direct deposit. A handwritten note is not accepted.
Good to know: If the page comes back with something to fix, your bank numbers and picture are kept: each shows its last 4 digits or its file name, with Change beside it.
New hires · Step 5 of 30
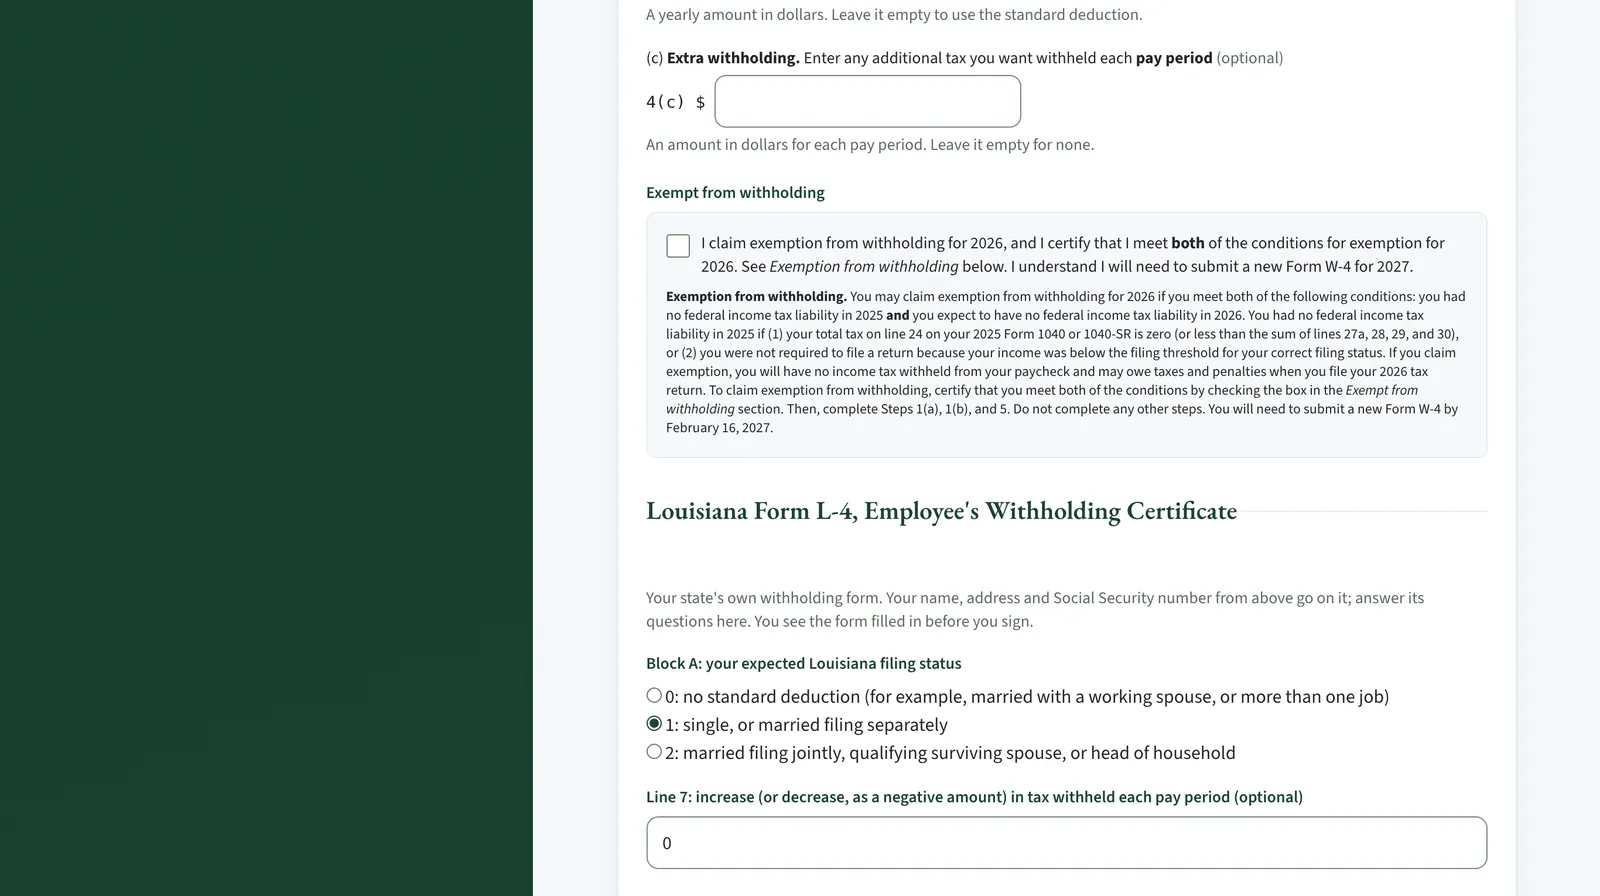
Tax withholding
Federal tax withholding (Form W-4) is the 2026 Form W-4 in the IRS's own words (in Spanish, the IRS's Form W-4(SP)).
- Check one box in Step 1(c), even if you claim exemption from withholding. Fill in Steps 2 and 4 only if they apply to you.
- The Step 3 total is required: enter 0 if you are not claiming dependents or other credits.
- If your work state or home state has its own withholding form, it comes next, under the form's name. Answer its questions; your name, address and Social Security number go on it for you.
- If one of your employer's documents asks questions of its own (a short test, or where you will work), they come last, under the document's name. Your answers go on the document.
Good to know: The state forms are the states' official English forms, so their names stay in English.
New hires · Step 6 of 30
Check every page
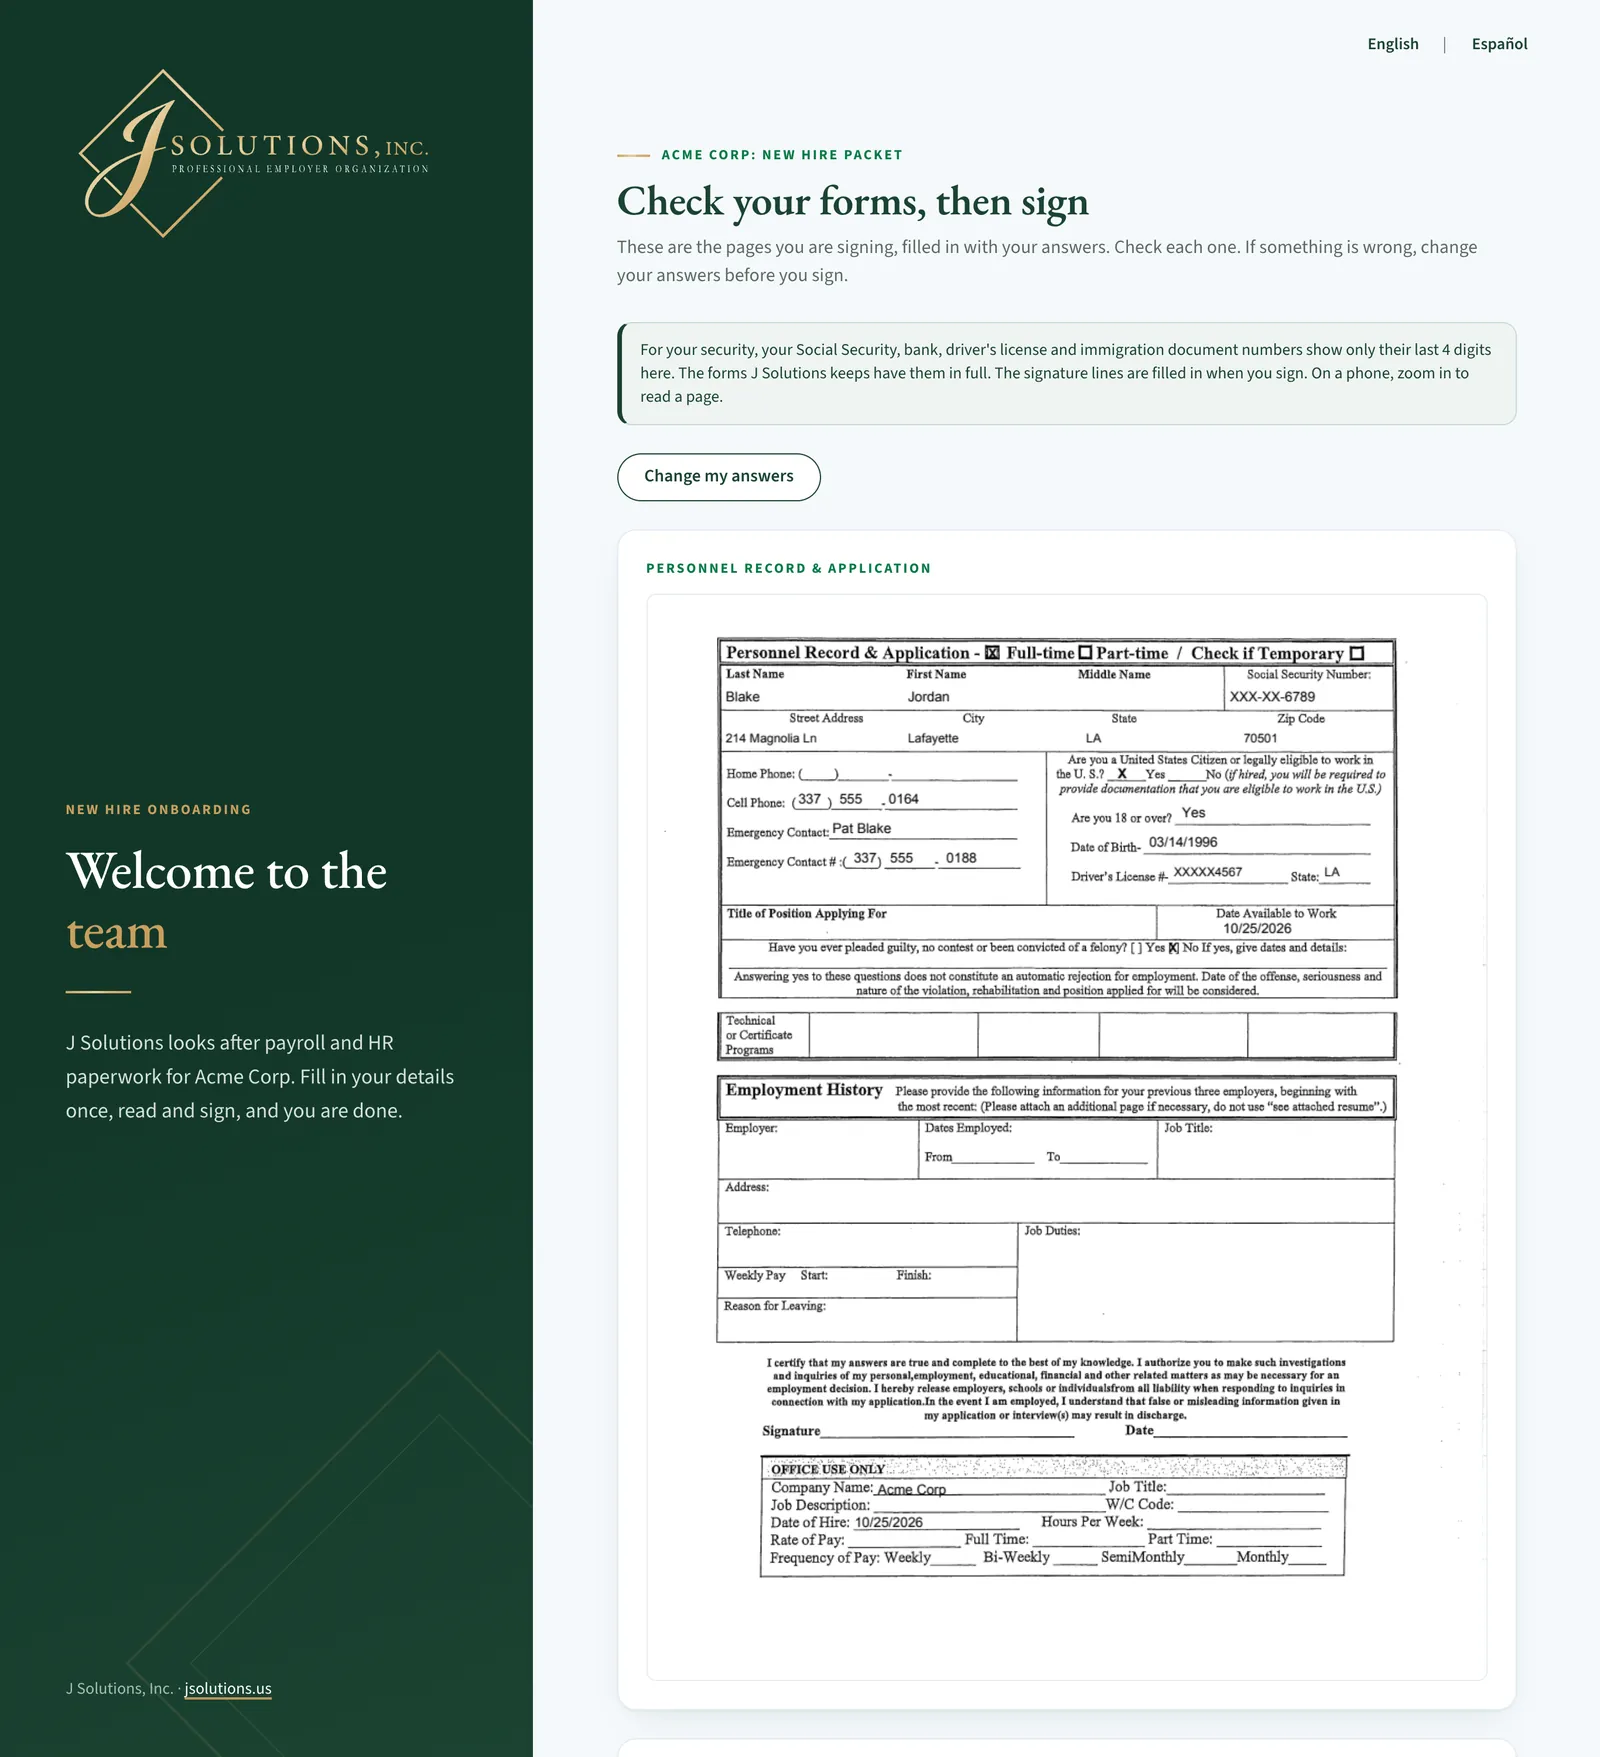
Click Review my forms. The next page, Check your forms, then sign, shows every page you are signing, filled in with your answers: the Personnel Record & Application, Form W-4, any state form, Form I-9 Section 1, the direct deposit form, and your employer's documents and policies.
- Check each one. On a phone, zoom in to read a page.
- For your security, your Social Security, bank, driver's license and immigration document numbers show only their last 4 digits here. The forms J Solutions keeps have them in full.
- Something wrong? Click Change my answers, fix it and click Review my forms again. Your answers are kept; leave a secret number's box empty to keep the one you entered.
Good to know: Nothing is signed yet on this page. If you stop here, open the link again later, while it works, to come back to your review.
New hires · Step 7 of 30
Sign once
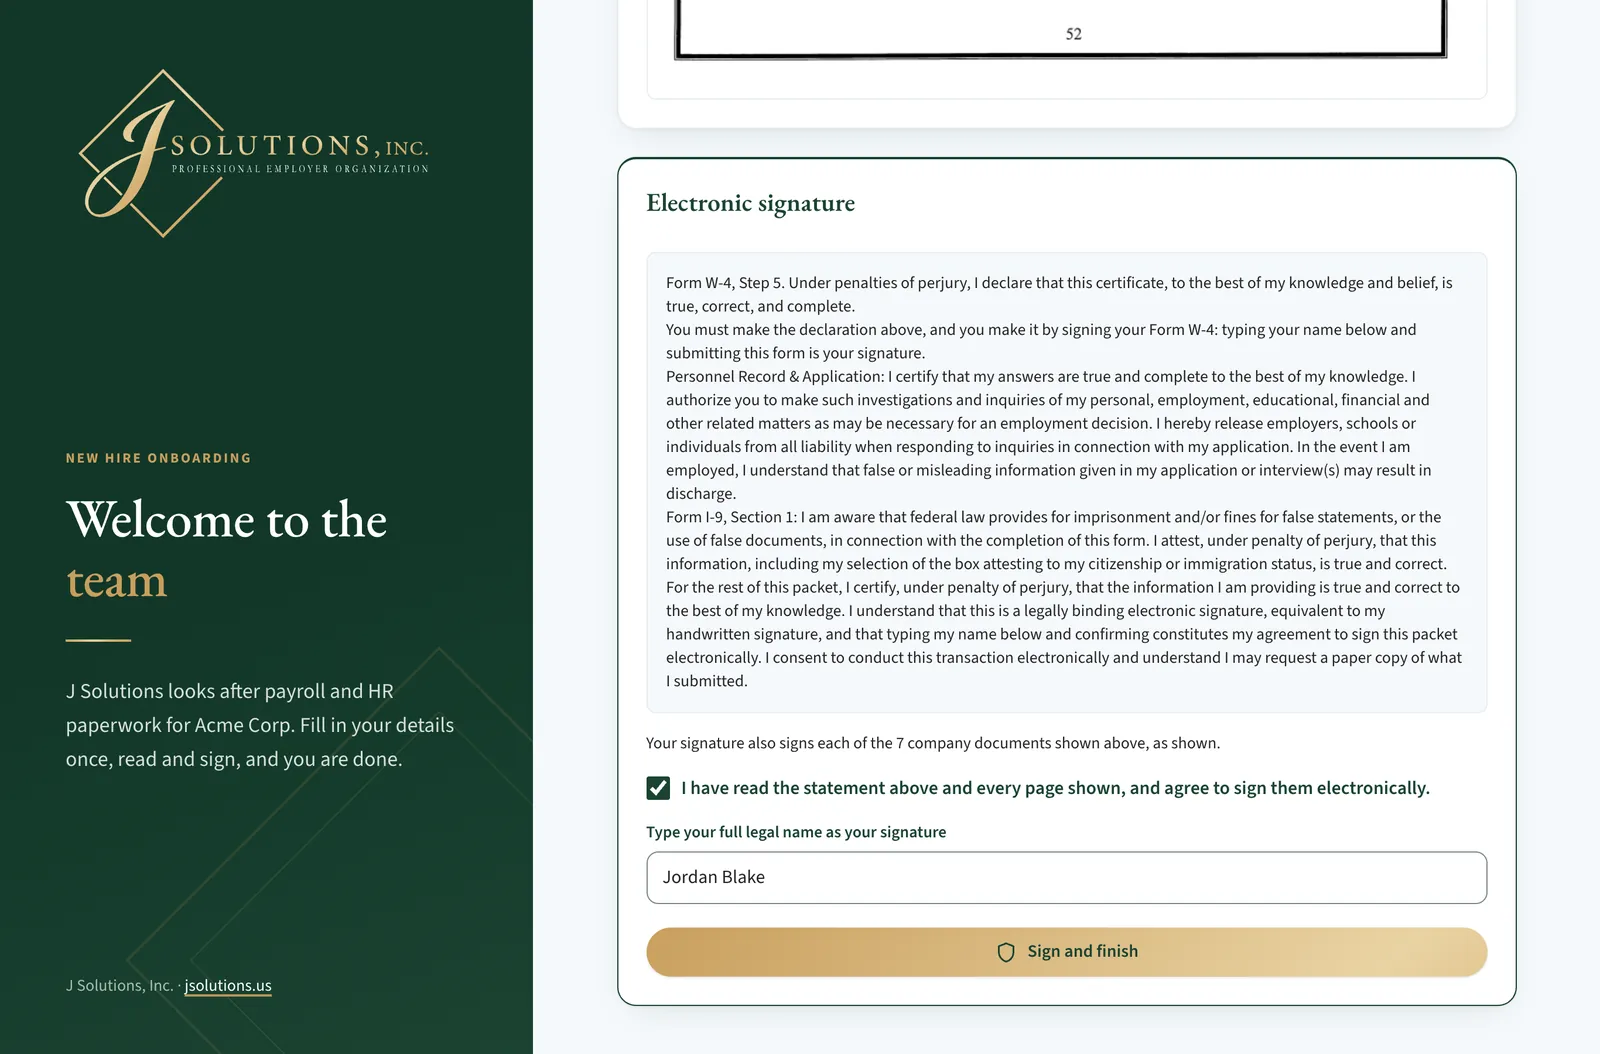
At the bottom of the review page, under Electronic signature, one signature signs your whole packet: your forms and every company document shown above it, as shown.
- Read the statement and tick the box to agree to sign electronically.
- Draw your signature in the box with your finger or mouse (Clear and draw again starts over), type your full legal name below it, and click Sign and finish. Both are needed: your drawn signature goes on every signature line of your forms.
Good to know: On the Spanish page you sign the statement in English for now, and the page explains in Spanish what it says. Company documents are in English too. Your information is encrypted and only used for your employment paperwork.
New hires · Step 8 of 30
Signed and sent
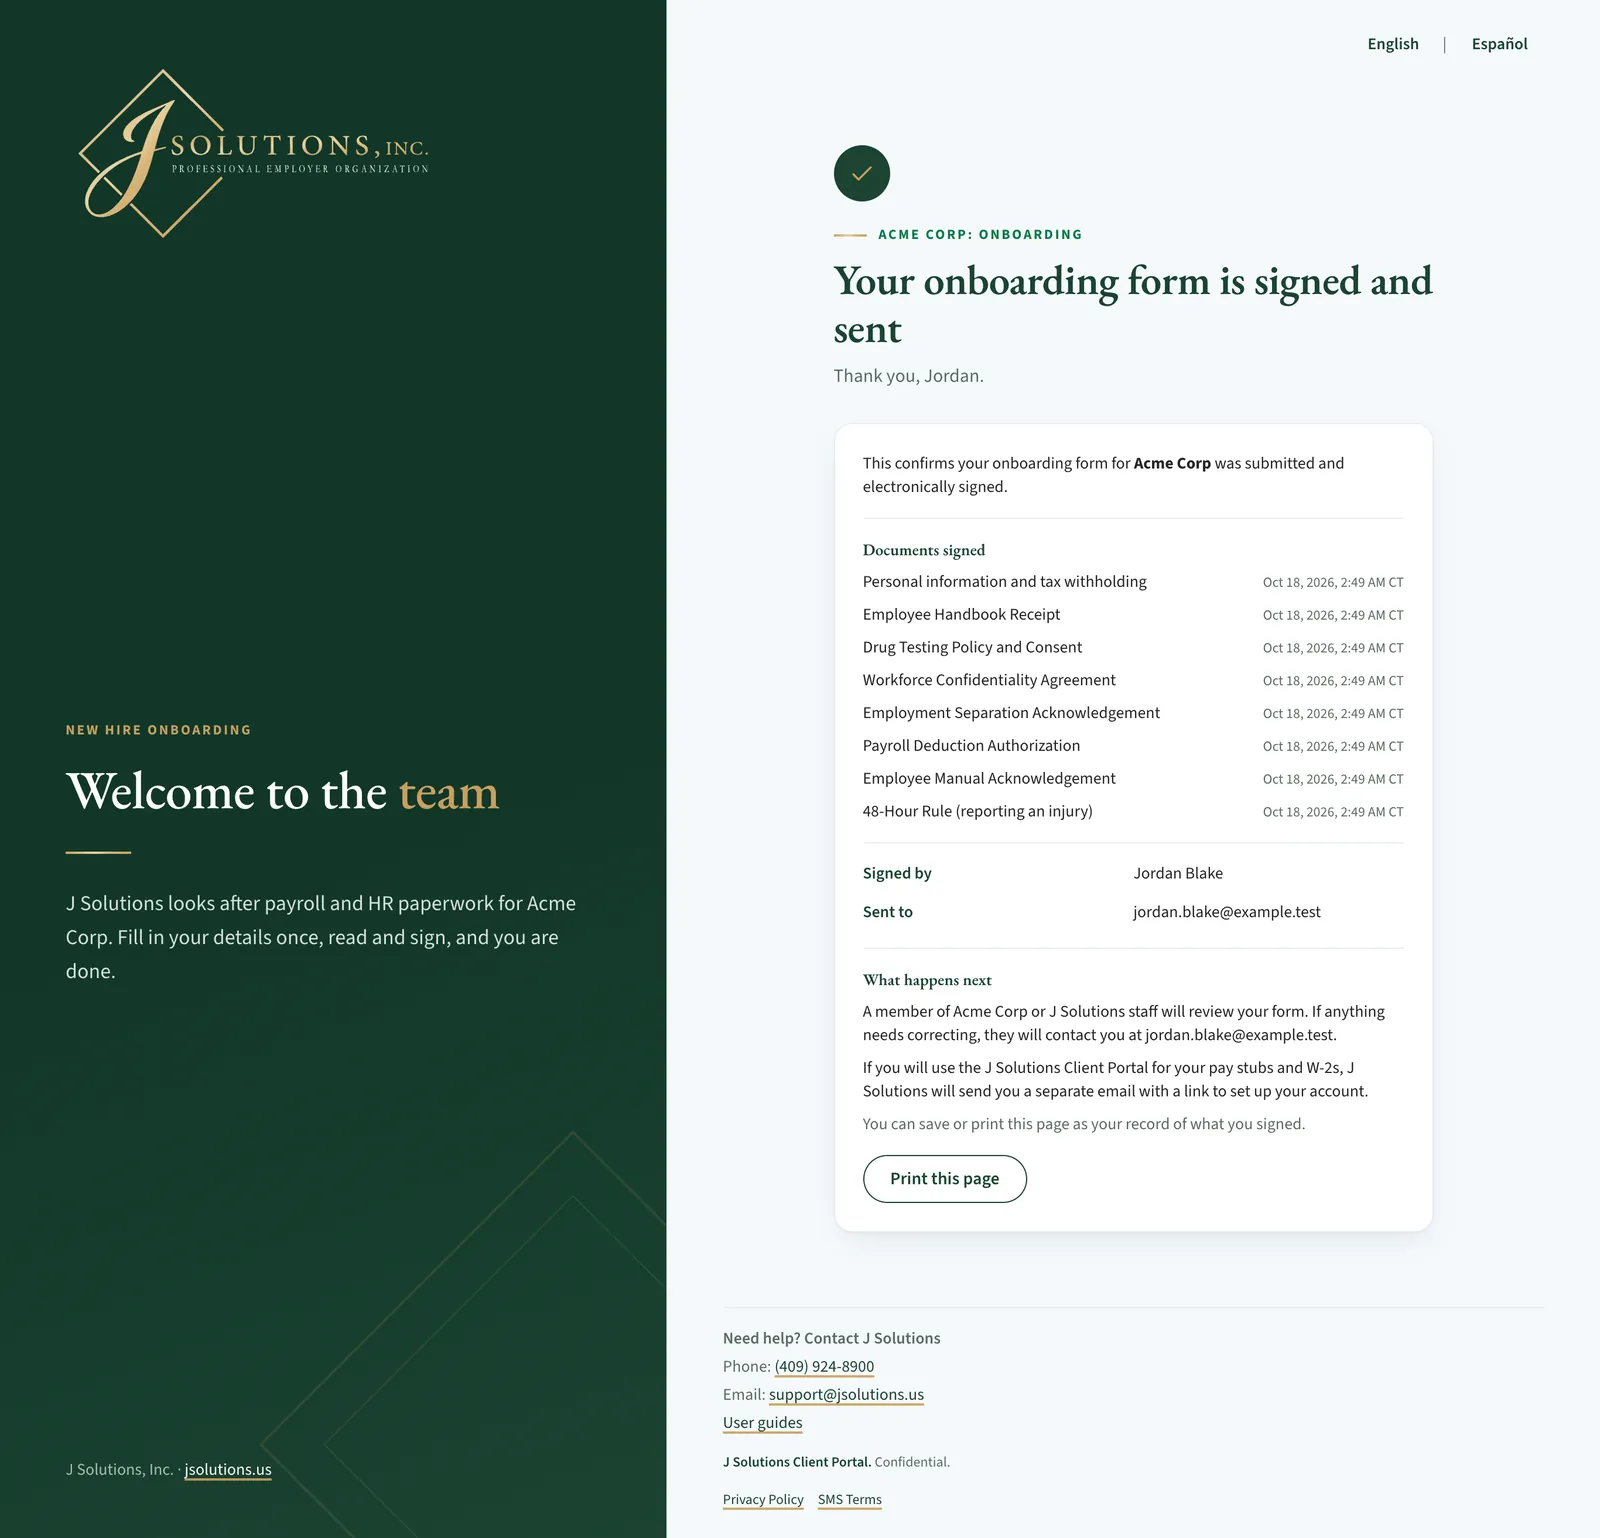
Your onboarding form is signed and sent confirms it, with the documents you signed and when.
- What happens next: your employer or J Solutions reviews your form, and contacts you by email if anything needs correcting.
- Your portal account, for your pay stubs and W-2s, is set up as you sign: click Choose my portal password on that page, or use the link we email you.
- Click Print this page to save or print it as your record.
Your portal account · Step 9 of 30
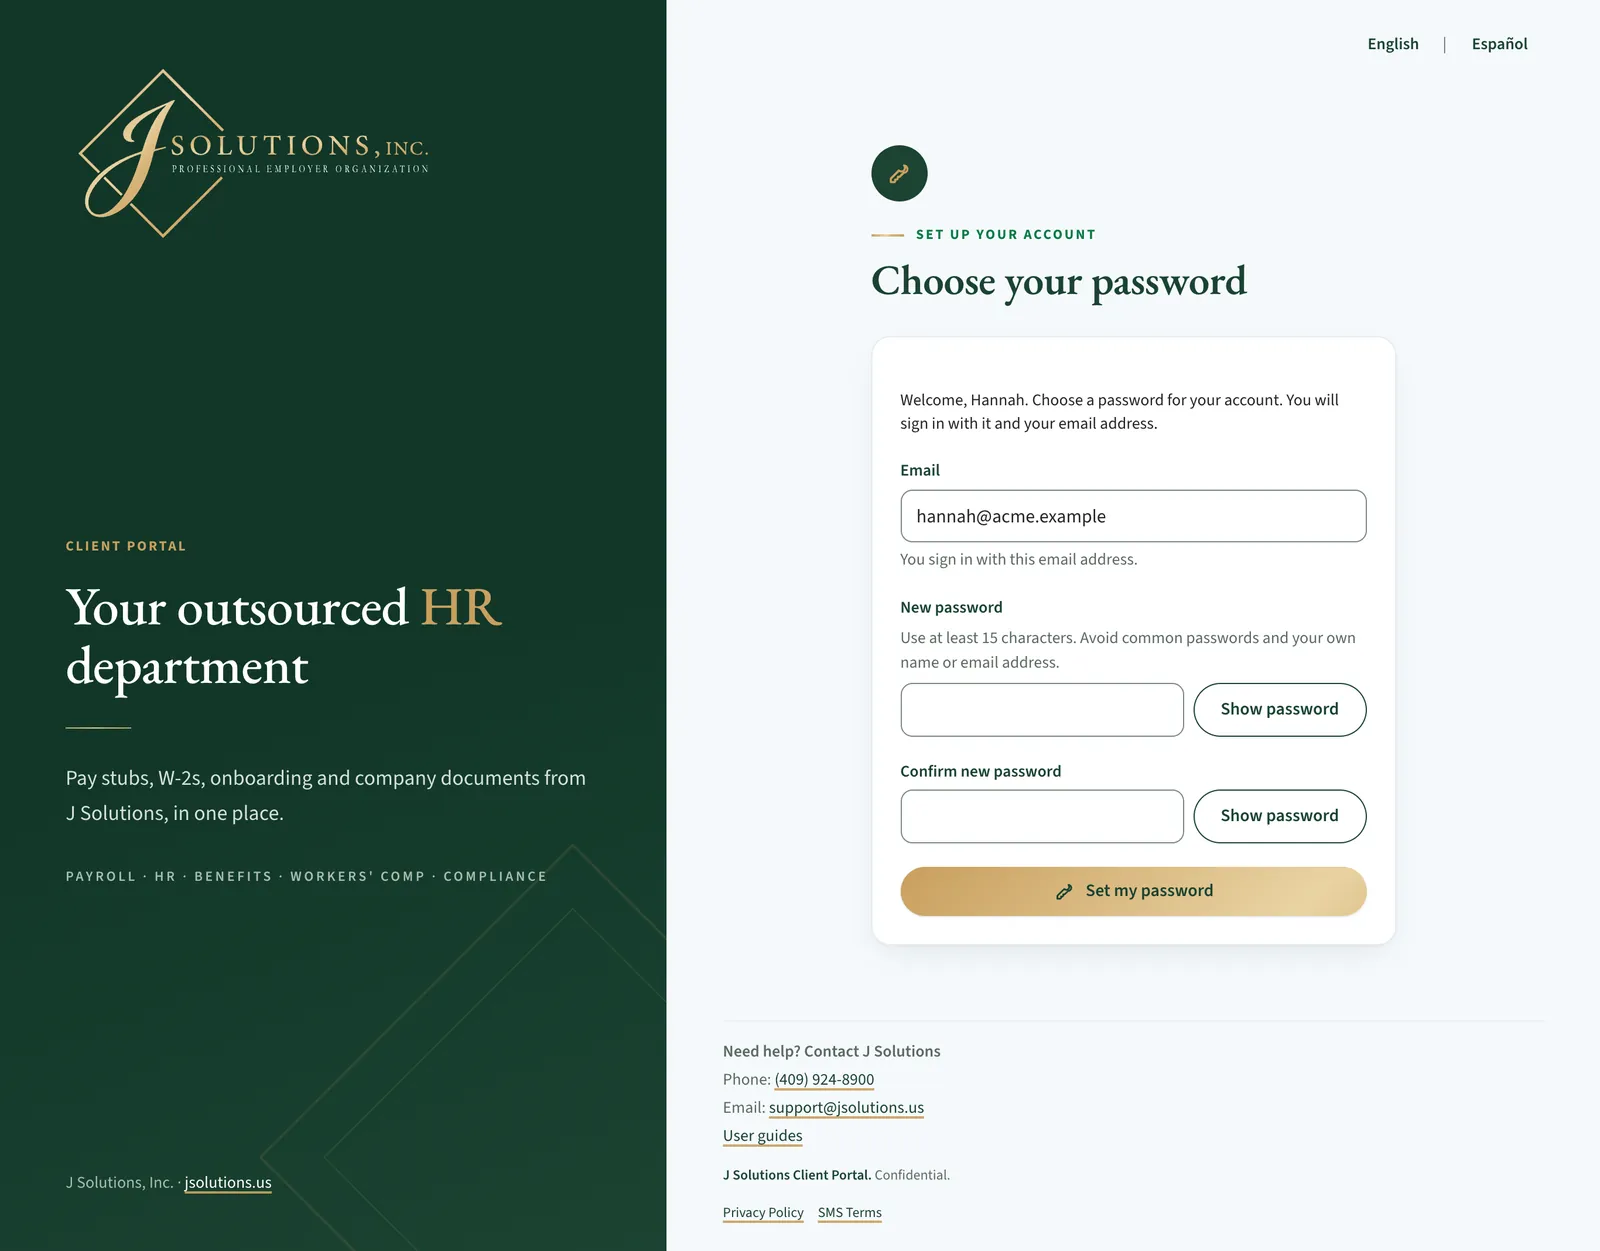
Choose your password
J Solutions also gives you a portal account for your pay stubs and W-2s. You get an email from noreply@jsolutions.us with a Choose my password button.
- Pick a password you do not use anywhere else, at least 15 characters, and click Set my password.
- The link works once. If it has expired, ask J Solutions for a new one.
Your portal account · Step 10 of 30
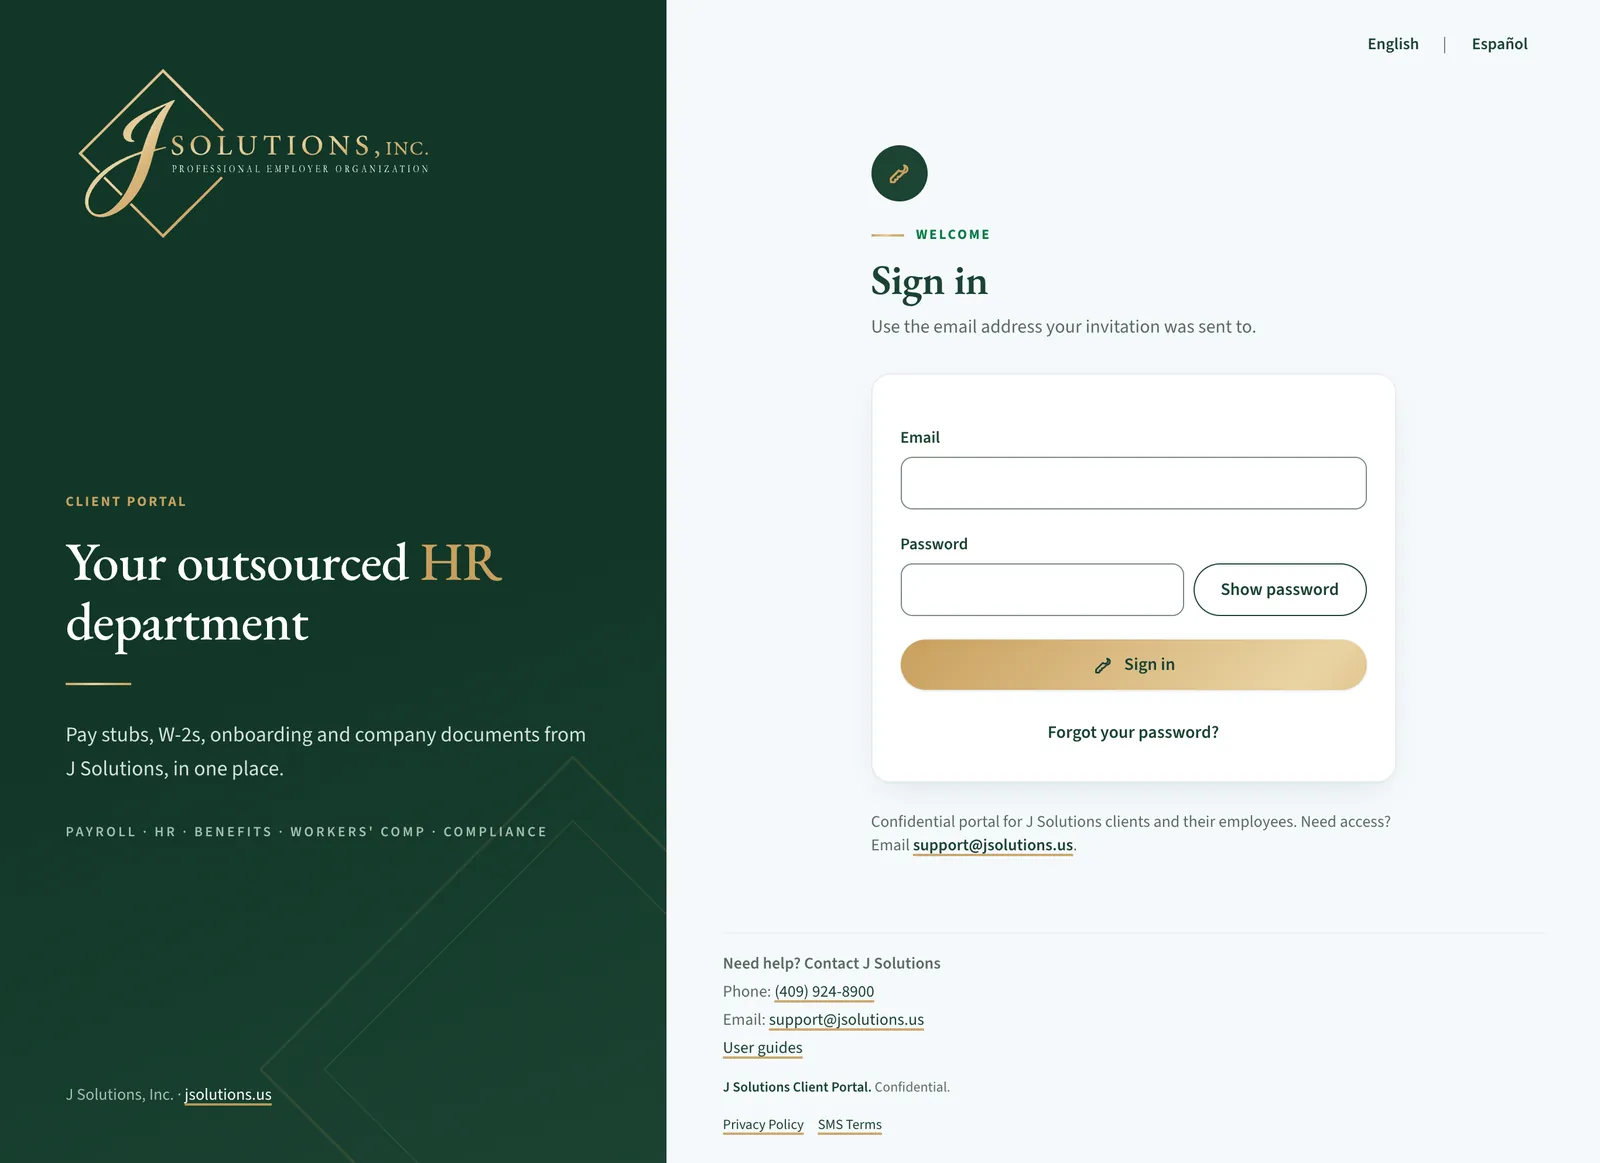
Signing in
Go to https://portal.jsolutions.us and sign in with your email and password.
- The English / Español switch at the top changes the sign-in pages. Once you sign in, the portal uses the language saved on your account.
- Forgot your password? Click Forgot your password? and a link is emailed to you.
Your portal account · Step 11 of 30
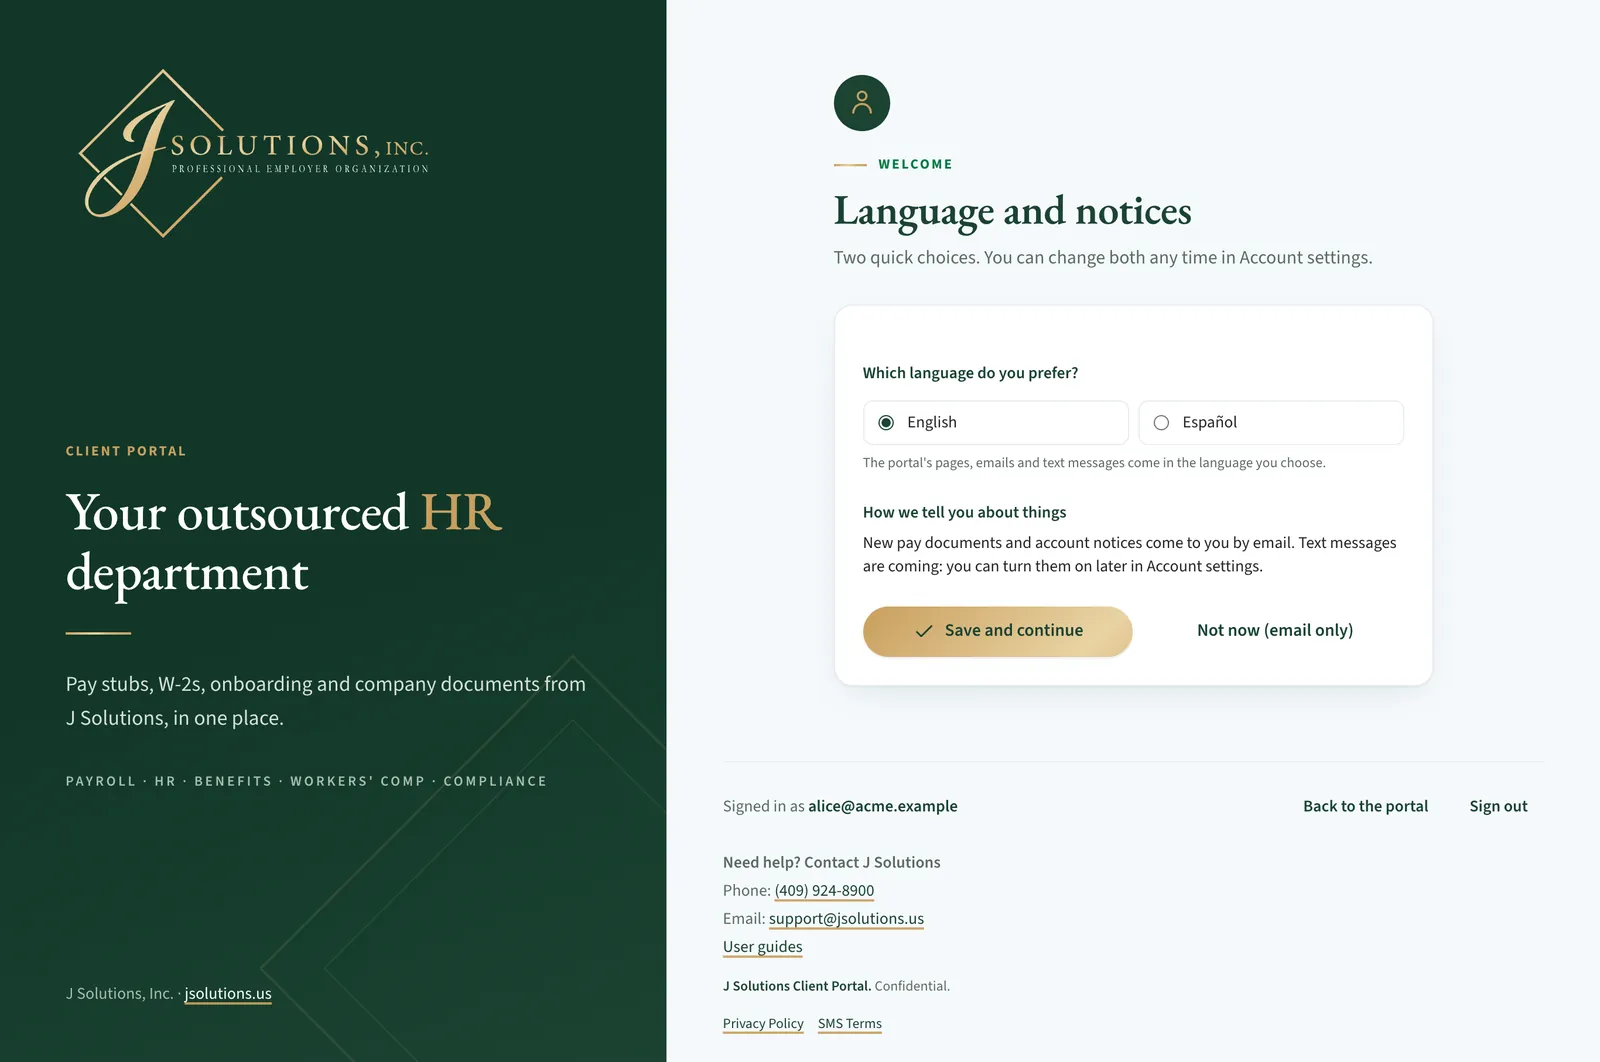
The first time you sign in
The first time you sign in, the portal asks once which language you prefer: English or Español.
- Your pages and emails come in the language you choose.
- You are told about new pay stubs and W-2s by email. Text messages are coming later; you will be able to turn them on in Account settings then.
- Click Save and continue, or Not now (email only).
- Then a short tour shows what each part of your menu is for. Click Next through it, or Skip the tour.
Your portal account · Step 12 of 30
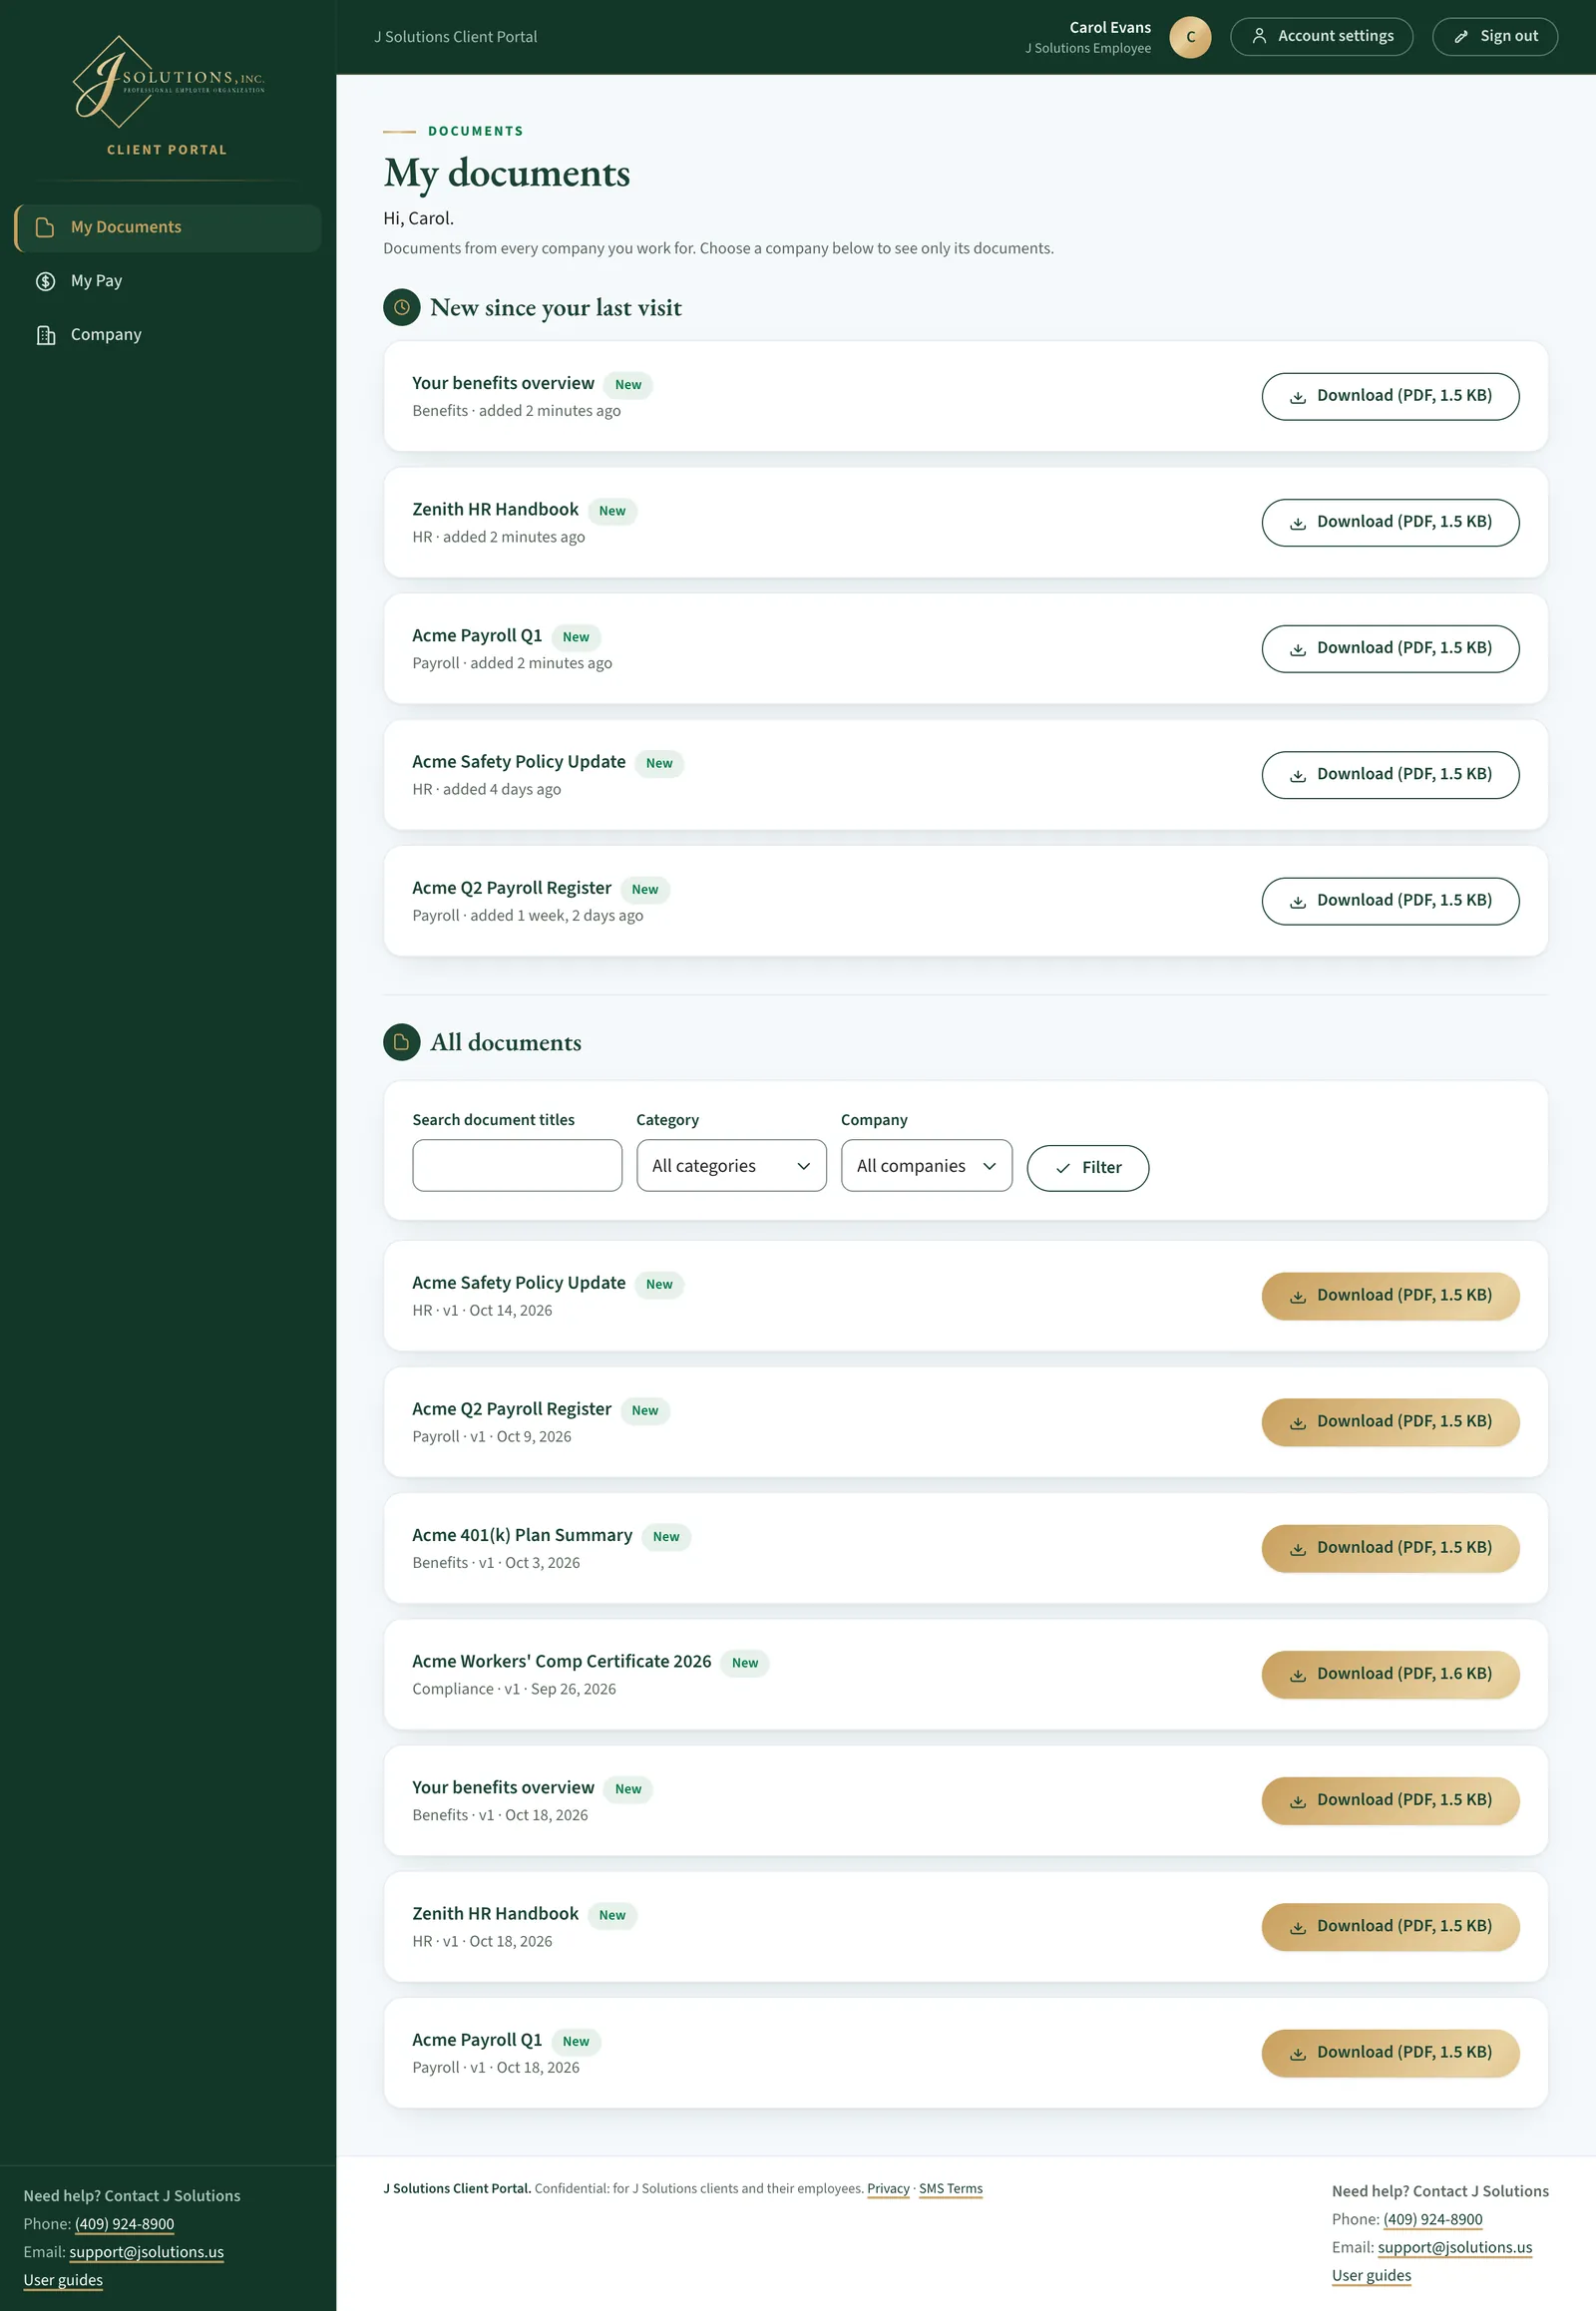
My Documents
Your home page shows documents from every company you work for.
- New since your last visit lists what was added since you last signed in.
- To see one company's documents, choose it in the Company box under All documents and click Filter. All companies shows everything again.
- Click Download to save a copy.
Your portal account · Step 13 of 30
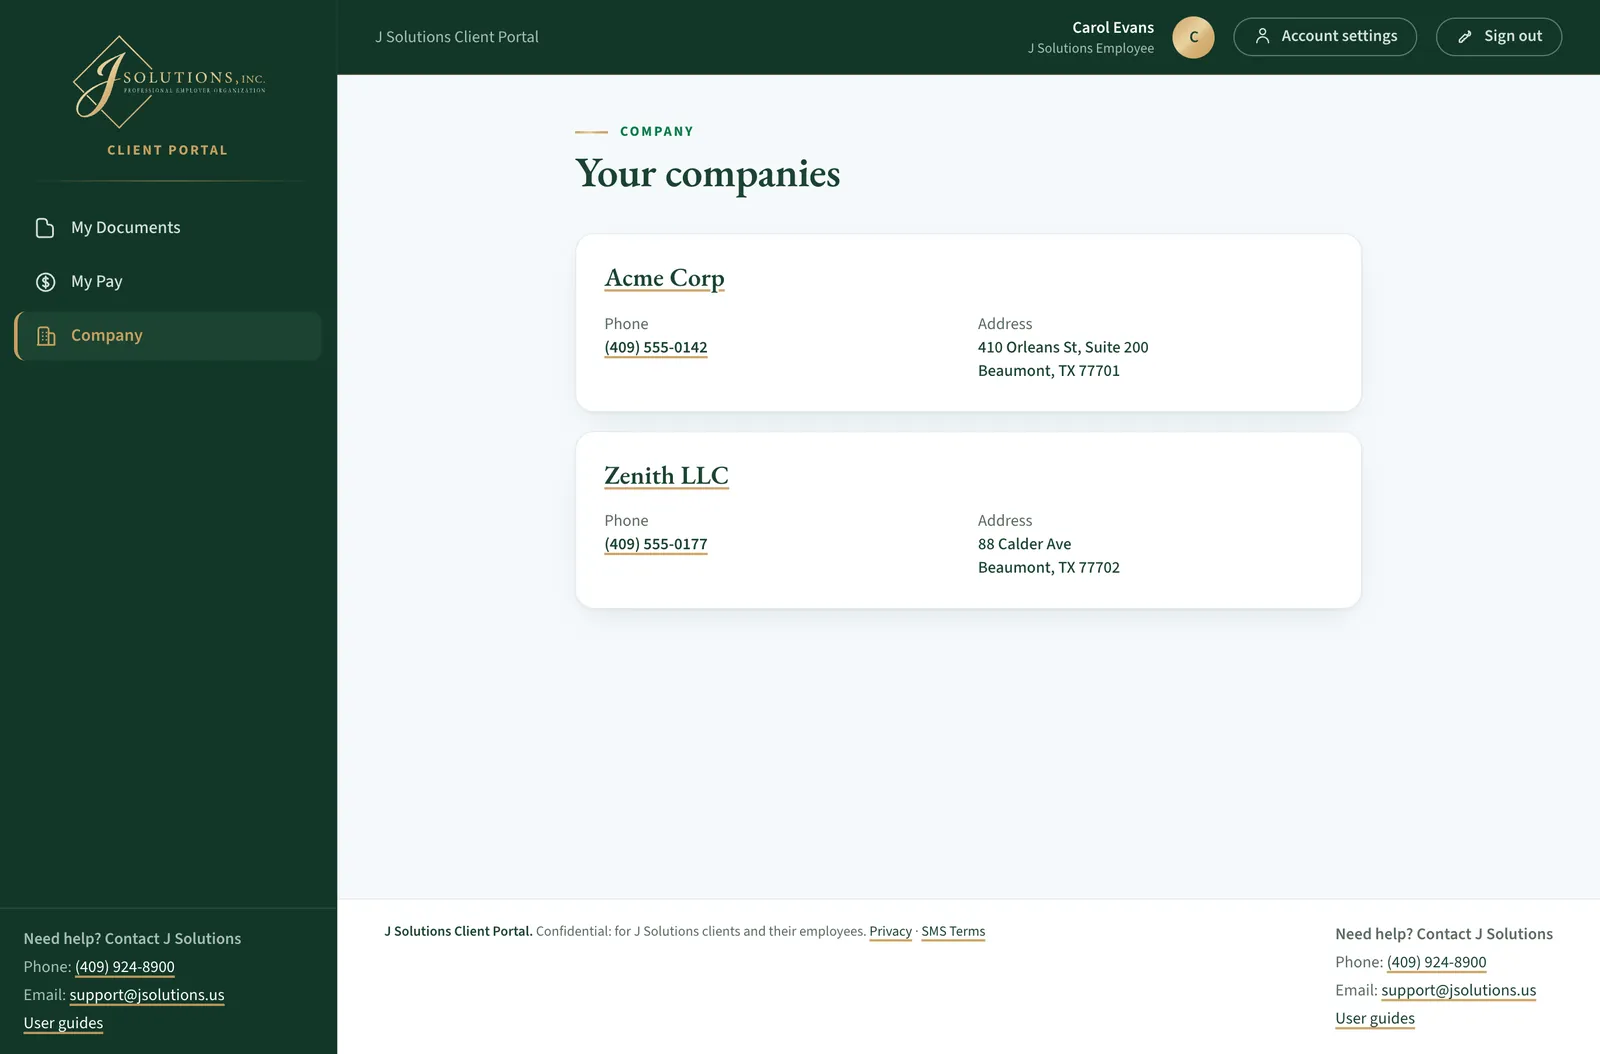
Your companies
If you work at more than one company, Company in the menu opens Your companies: each company with its phone number and address.
- Click a company's name to open its page.
- If you work at one company, Company opens its page straight away.
Your portal account · Step 14 of 30
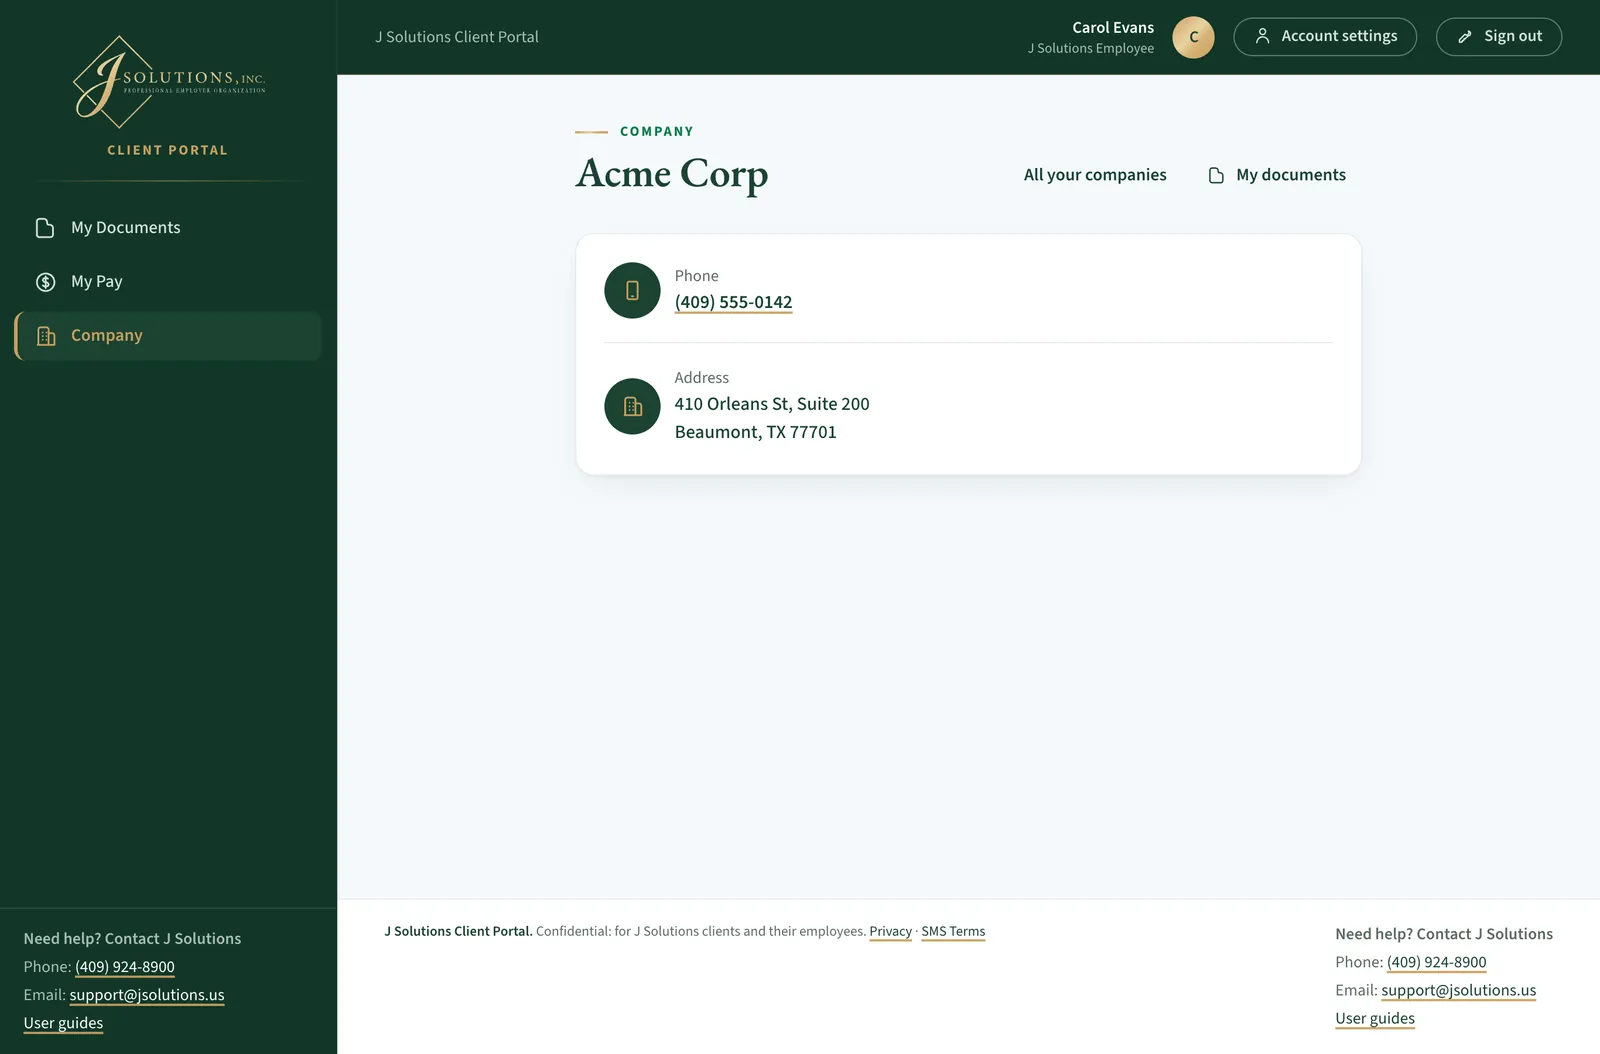
One company's page
A company's page shows its phone number and address. On a phone, tap the number to call.
- All your companies goes back to the list; My documents goes to your documents.
My Pay · Step 15 of 30
First visit: choose how to get your codes
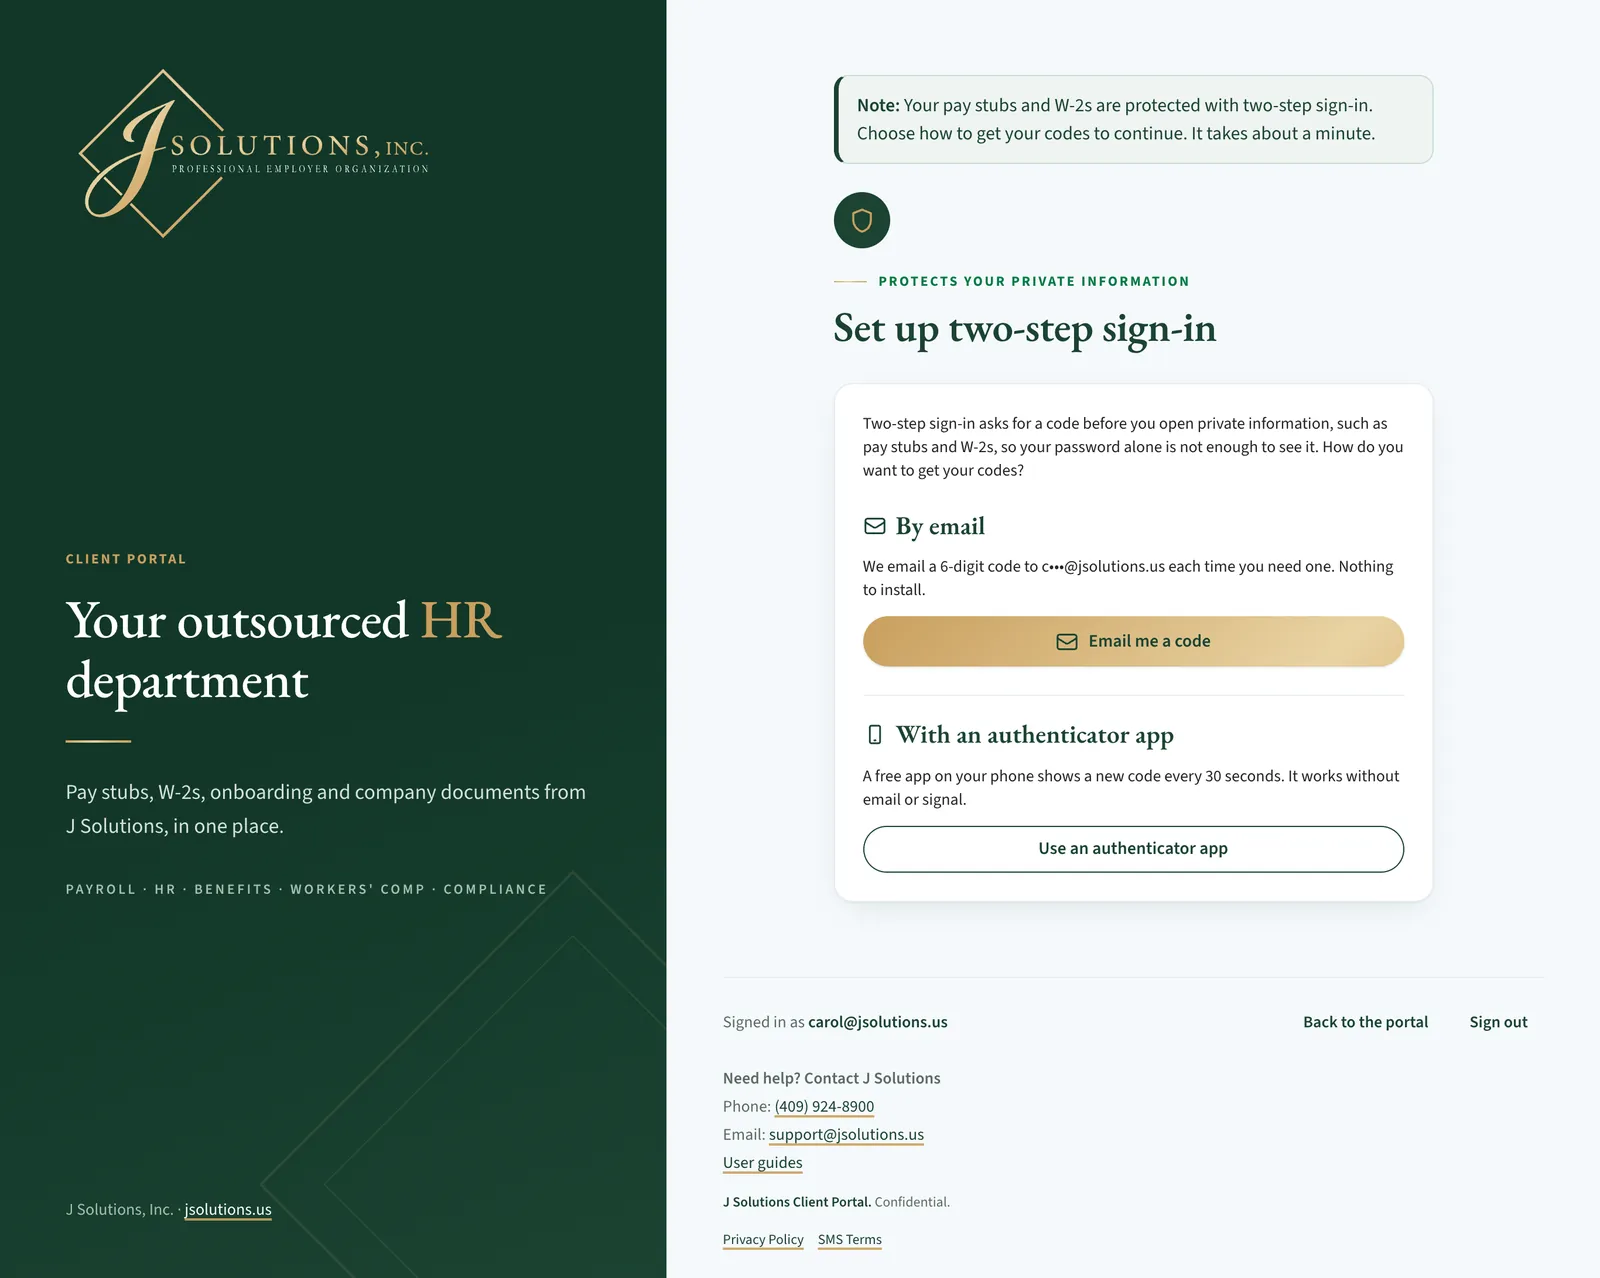
Pay stubs and W-2s are private, so the first time you open My Pay the portal asks you to set up two-step sign-in: a code you enter after your password. It takes about a minute.
- By email: we email you a 6-digit code each time you need one. Nothing to install. Click Email me a code.
- With an authenticator app: a free app on your phone shows a new code every 30 seconds, and works without email or signal. Click Use an authenticator app (the steps after next).
Good to know: Your company may have emailed codes switched off. Then the portal goes straight to the authenticator app.
My Pay · Step 16 of 30
Codes by email
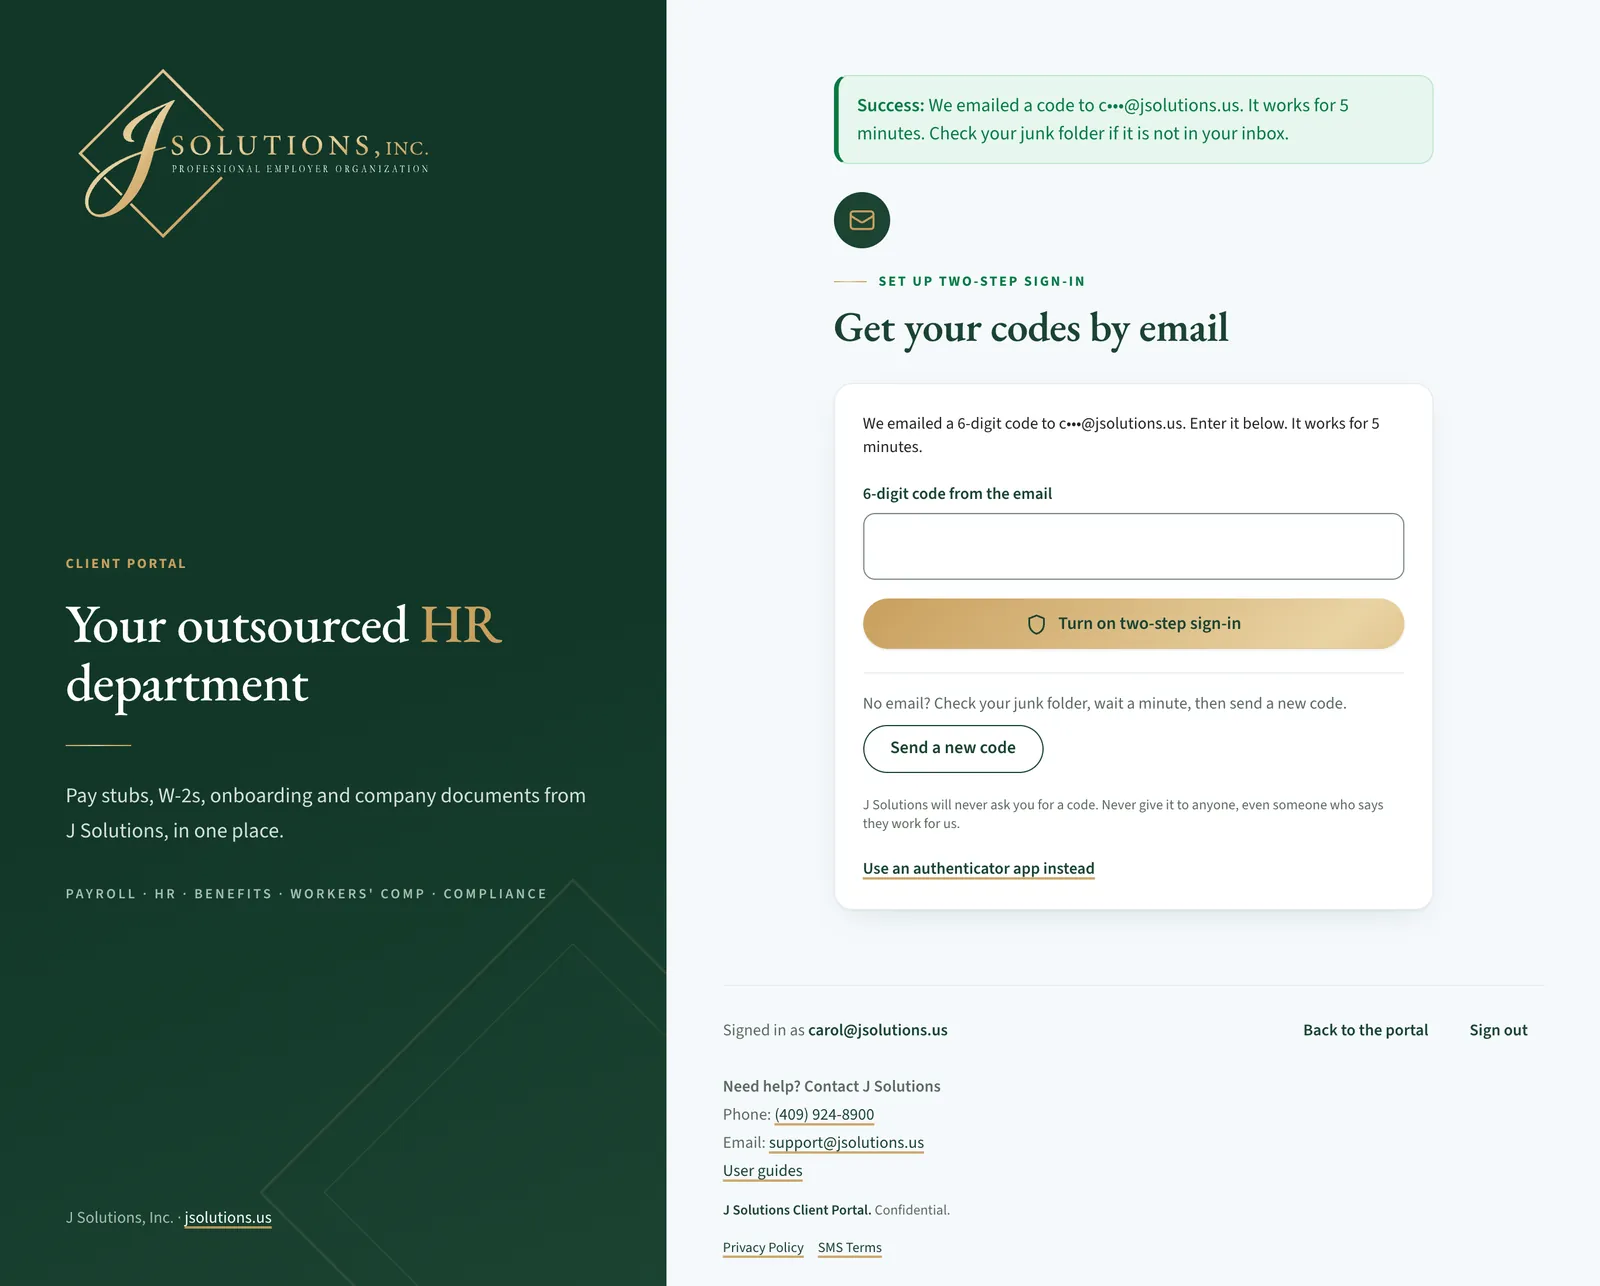
We email a 6-digit code to the address you sign in with. The page shows the start of the address so you know where to look.
- Open the email "Your J Solutions sign-in code", type the code in 6-digit code from the email and click Turn on two-step sign-in.
- Each code works once, for 5 minutes. No email? Check your junk folder, wait a minute, then click Send a new code.
- Use an authenticator app instead switches to the app.
Good to know: J Solutions will never ask you for a code. Never give it to anyone, even someone who says they work for us.
My Pay · Step 17 of 30
Or: get an authenticator app
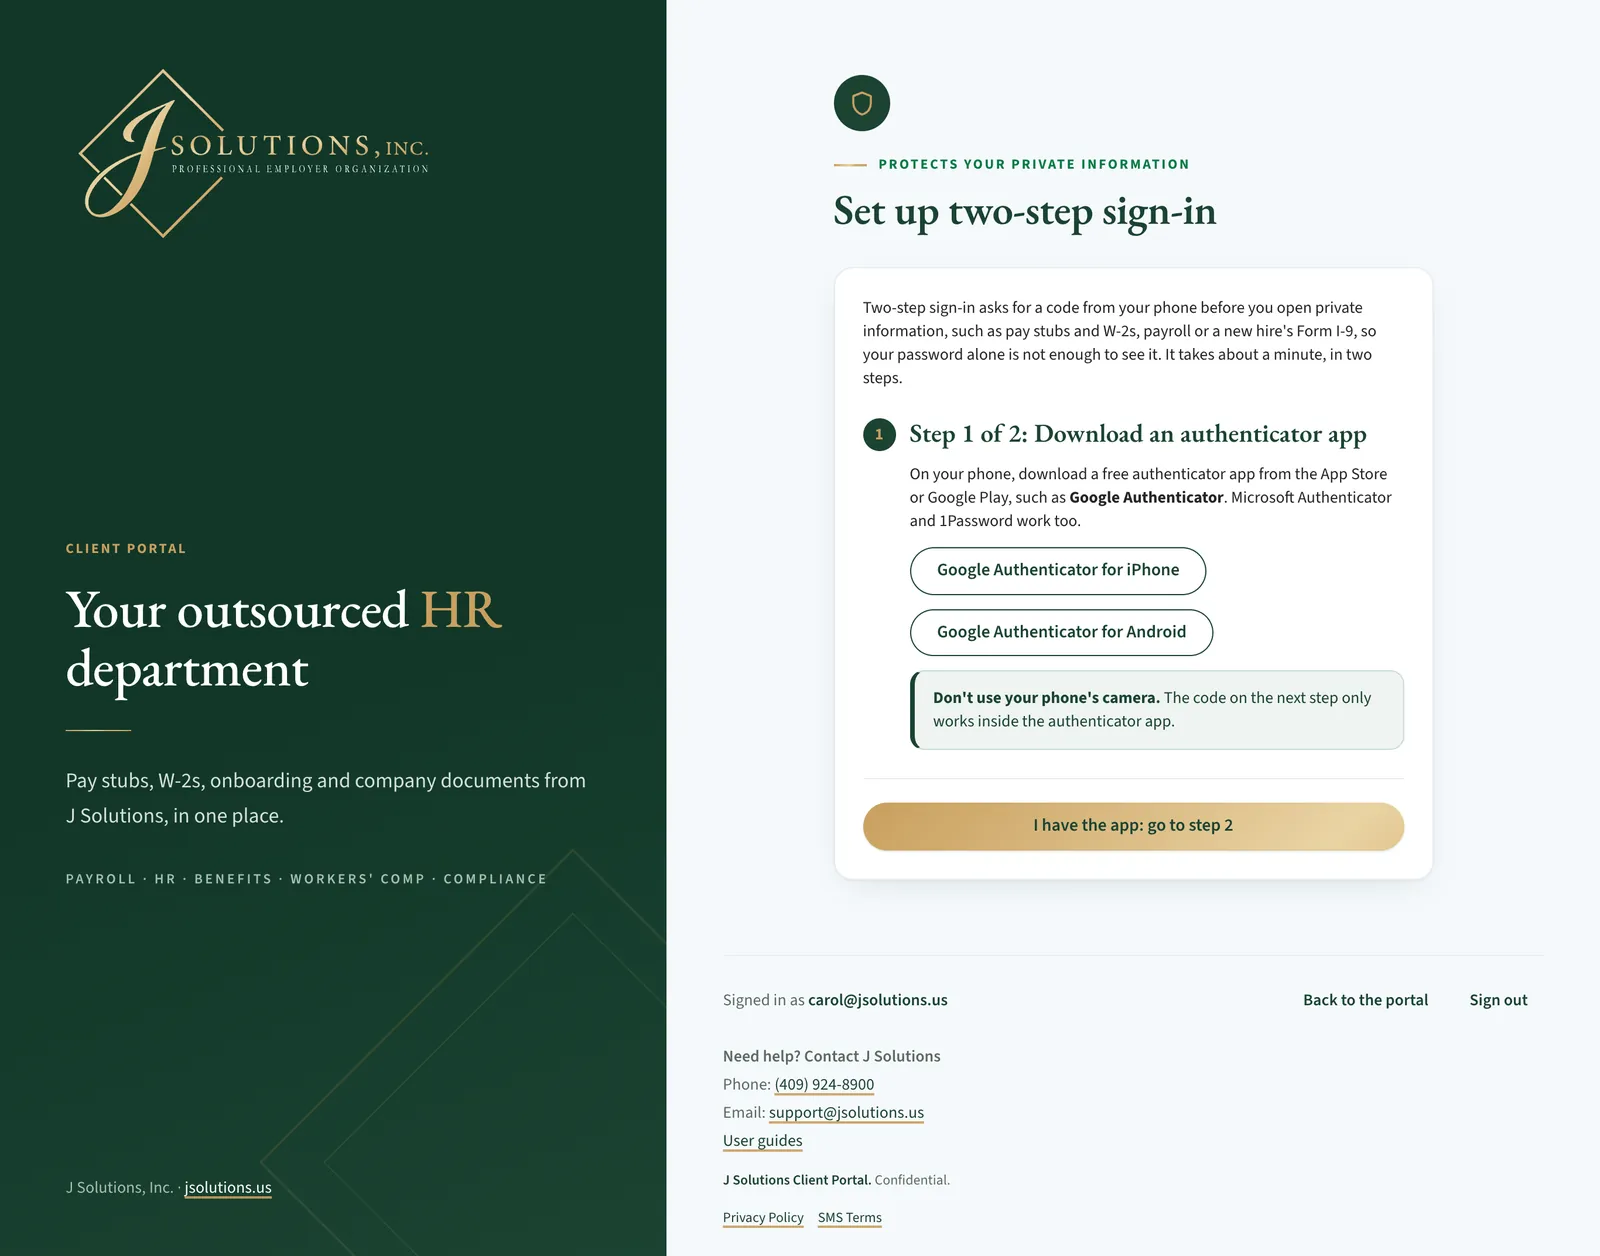
If you chose the authenticator app, setting it up takes two steps.
- Step 1 of 2: Download an authenticator app: on your phone, download a free authenticator app from the App Store or Google Play, such as Google Authenticator. Microsoft Authenticator and 1Password work too.
- The buttons Google Authenticator for iPhone and Google Authenticator for Android open the app's store page.
- Don't use your phone's camera: the code on the next step only works inside the authenticator app.
- Click I have the app: go to step 2.
My Pay · Step 18 of 30
Then add your account to the app
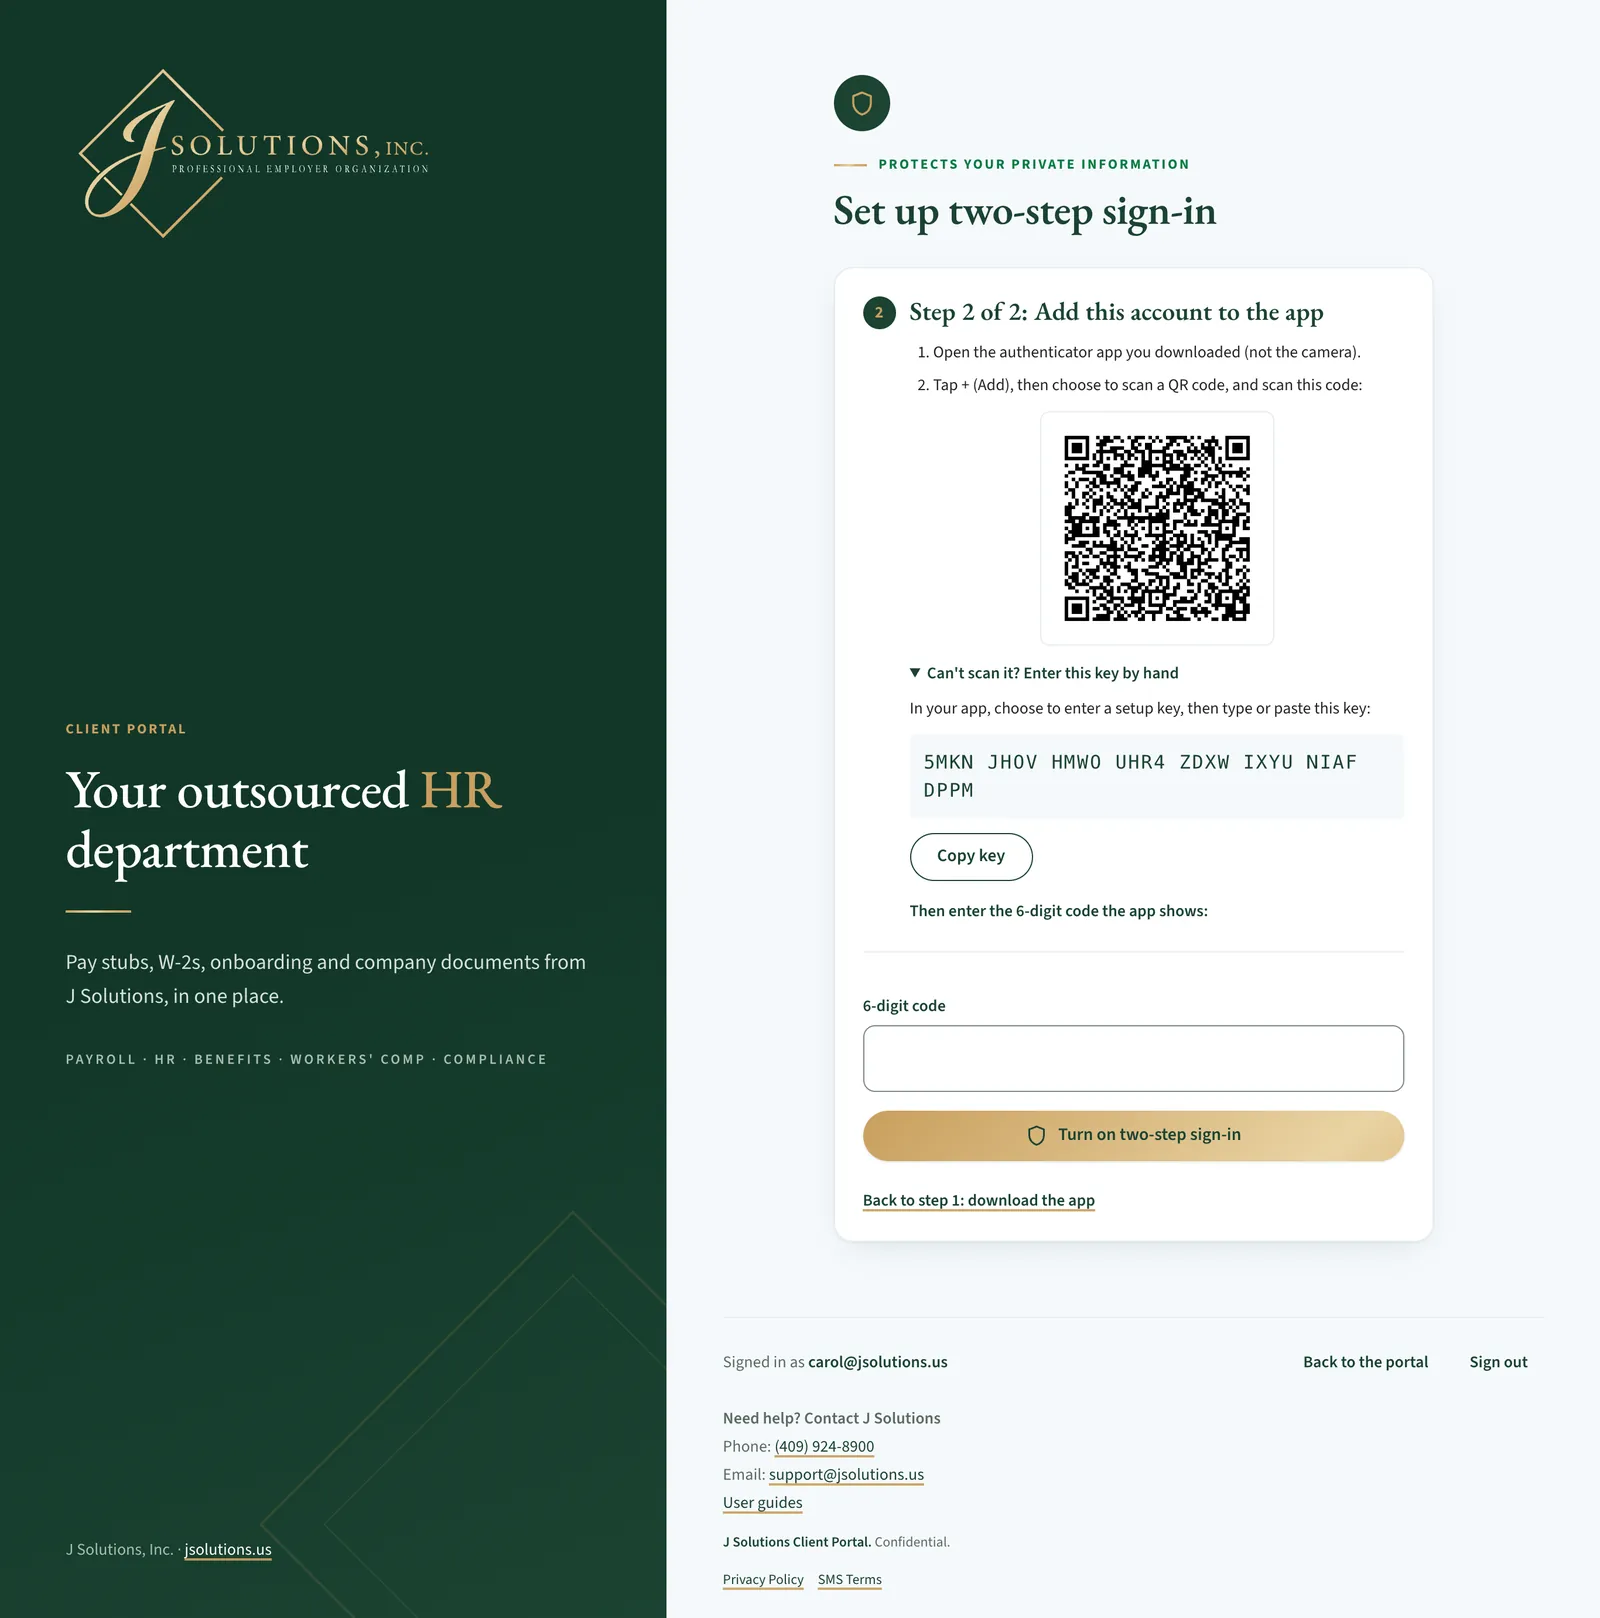
Step 2 of 2: Add this account to the app. Open the authenticator app you downloaded, tap + (Add) and choose to scan a QR code.
- On a computer, scan the square code with the app. On your phone, tap Add to authenticator app instead.
- Can't scan it? Open Can't scan it? Enter this key by hand and type the key into the app, or use Copy key and paste it.
- Type the 6-digit code the app shows and click Turn on two-step sign-in.
- Back to step 1: download the app goes back if you do not have the app yet.
My Pay · Step 19 of 30
Save your recovery codes
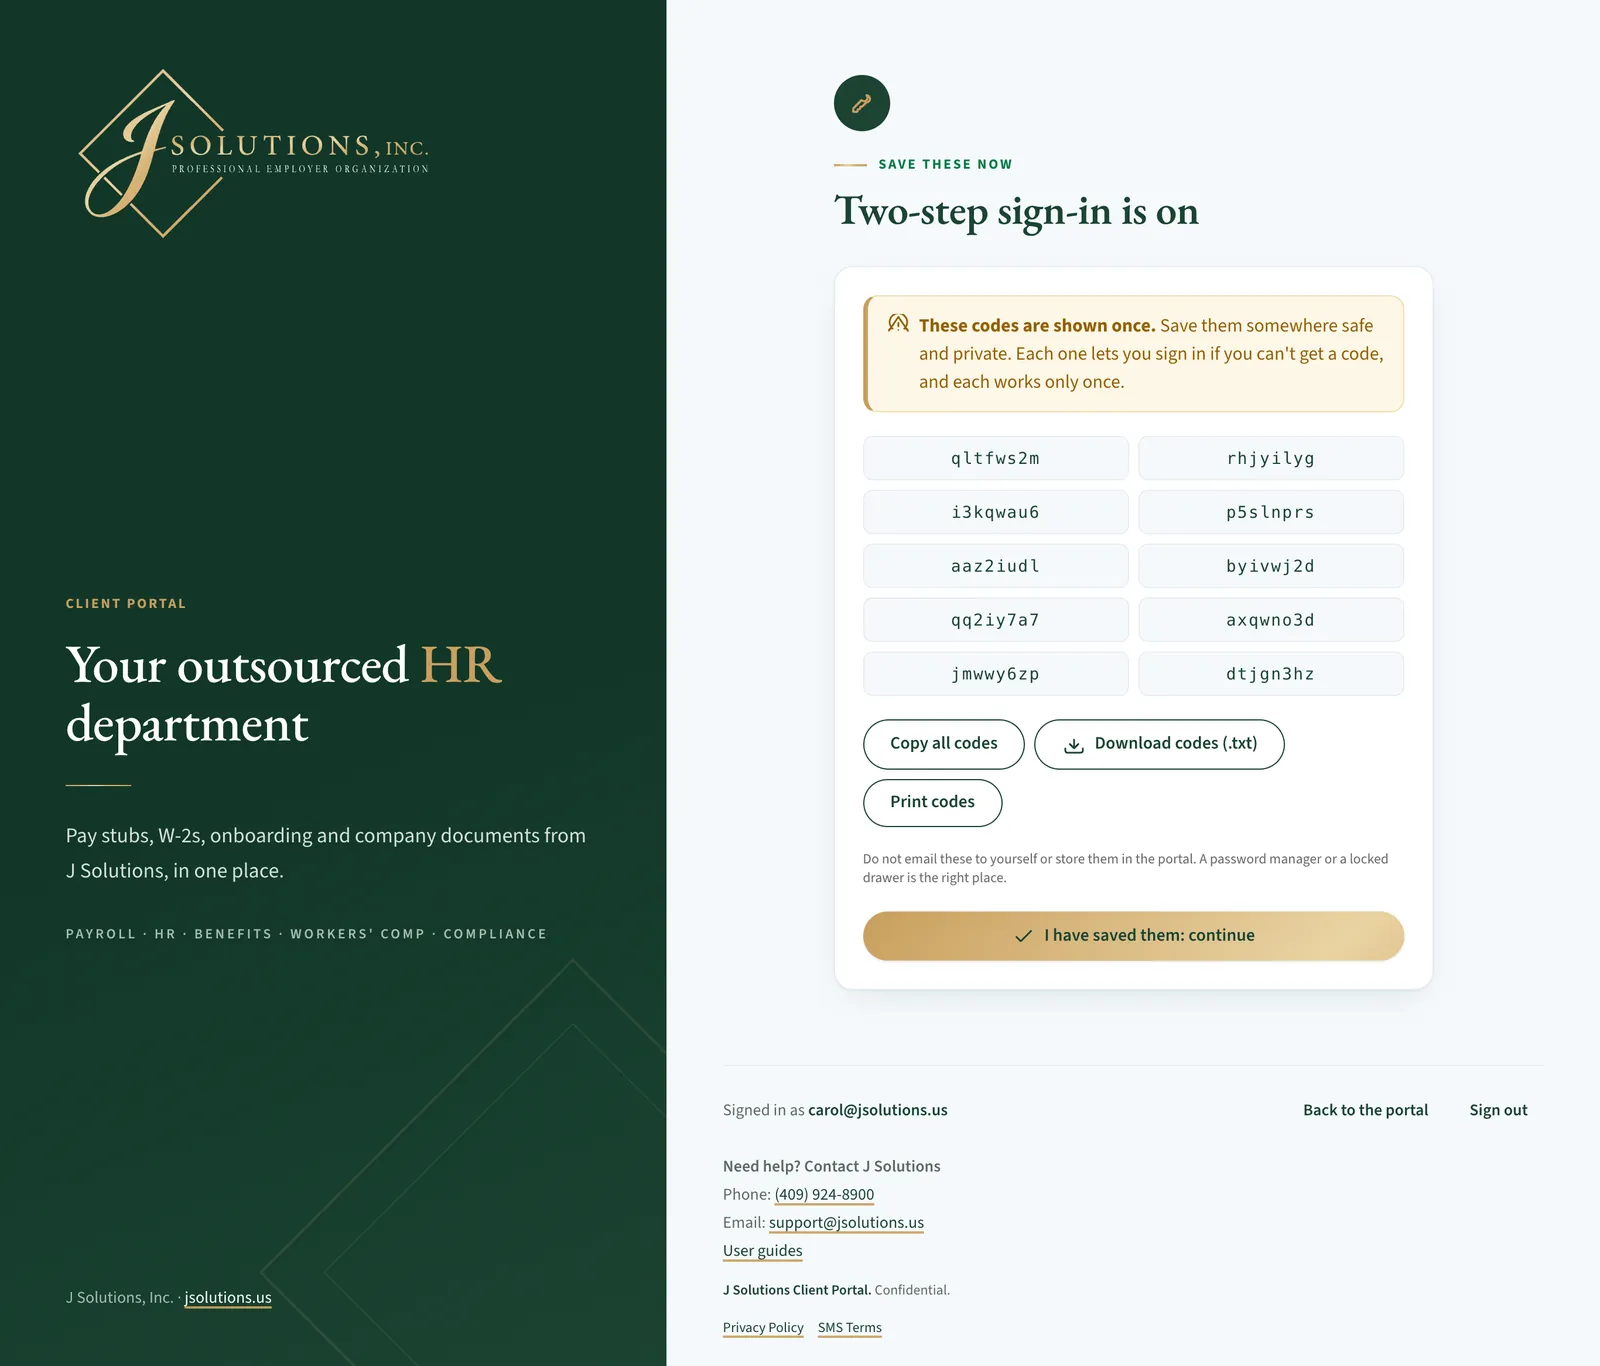
The portal then shows ten recovery codes, only once. Each one lets you in once if you can't get a code.
- Click Copy all codes, Download codes (.txt) or Print codes, and keep them somewhere safe and private, such as a password manager or a locked drawer.
- Do not email them to yourself.
- Click I have saved them: continue.
My Pay · Step 20 of 30
Your pay stubs and W-2s
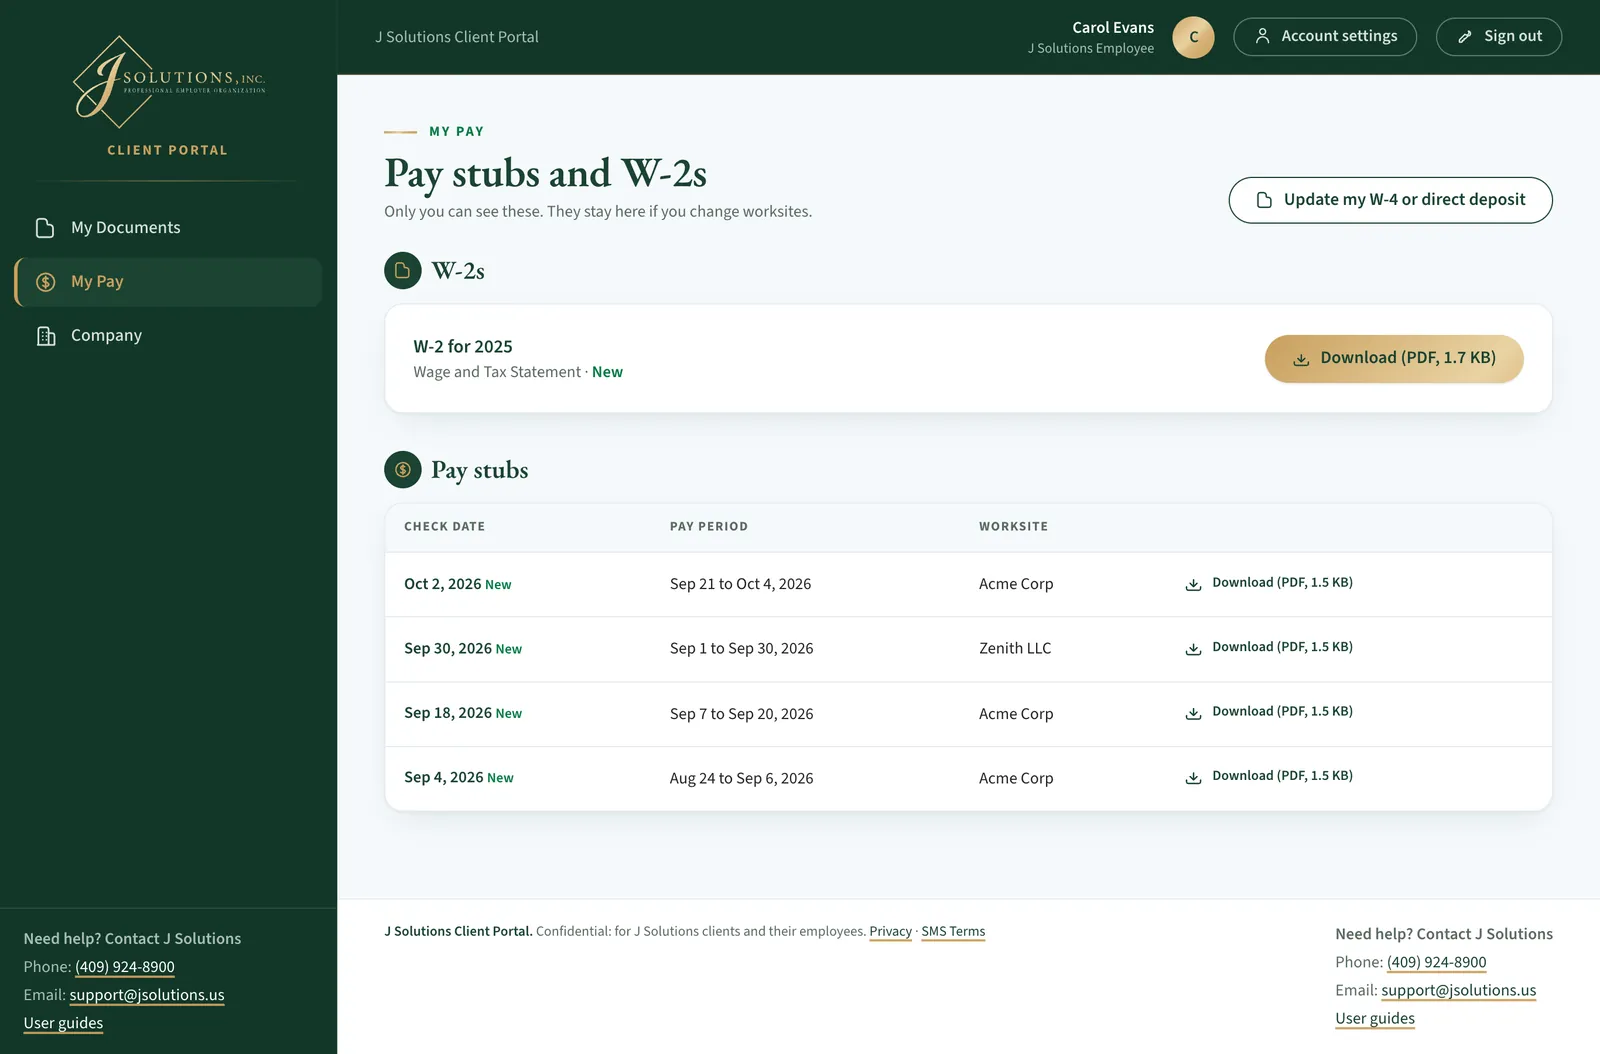
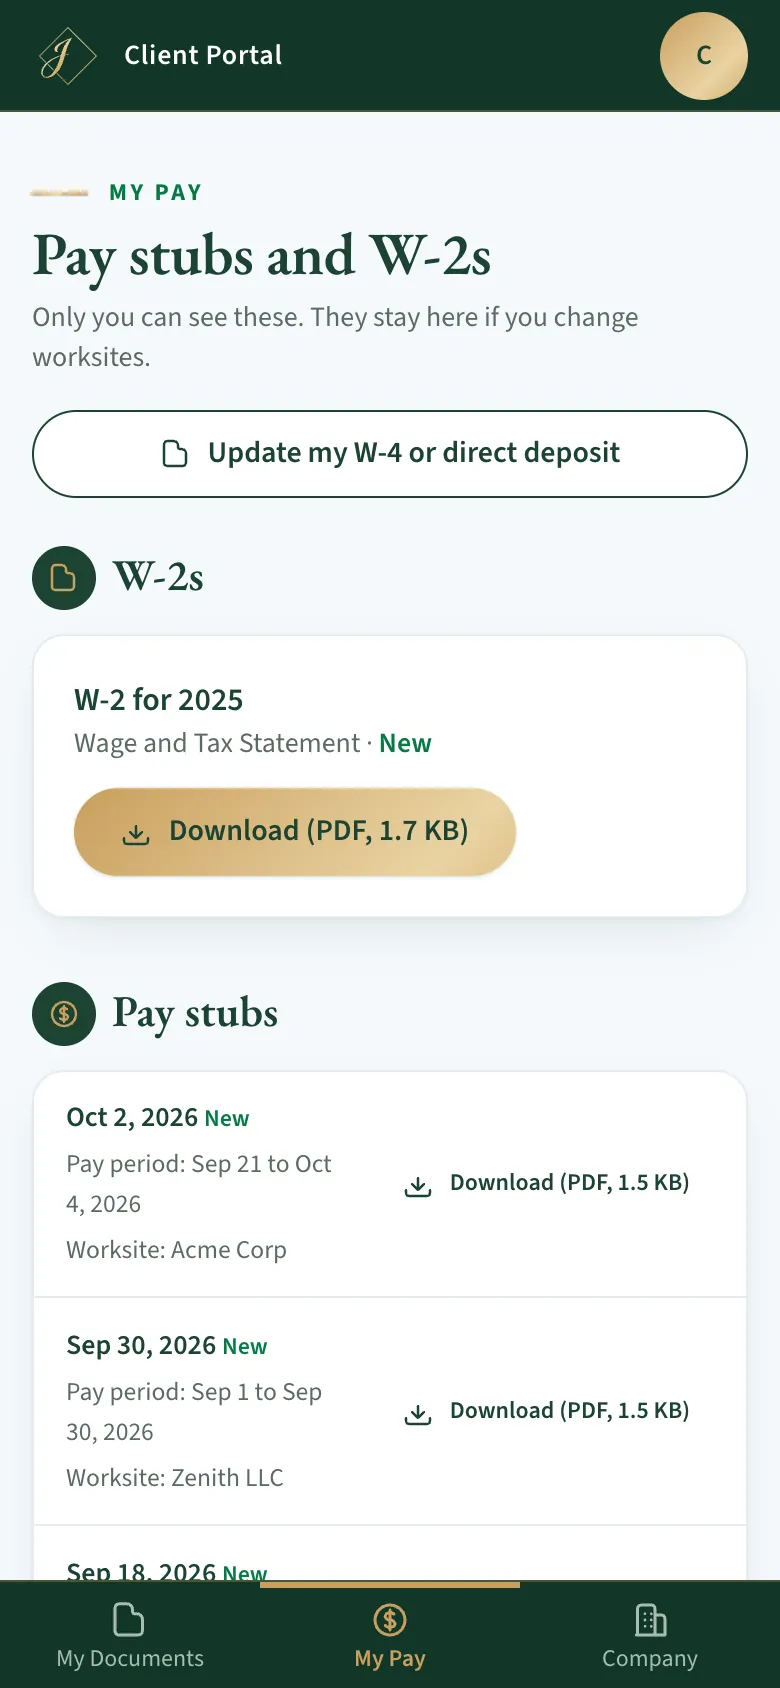
My Pay lists your W-2s and every pay stub, newest first, with the check date, pay period and worksite. Only you can see these.
- A pay stub shows here as soon as J Solutions files it, often a few days before payday, and you get an email saying it is ready. If your hours look wrong, contact J Solutions right away.
- New marks documents you have not opened yet.
- Click Download to save or print a PDF copy.
- Your documents stay here if you change worksites.
Good to know: J Solutions never emails your pay stubs or W-2s. The email only says a new one is ready: sign in here to see it.
My Pay · Step 21 of 30
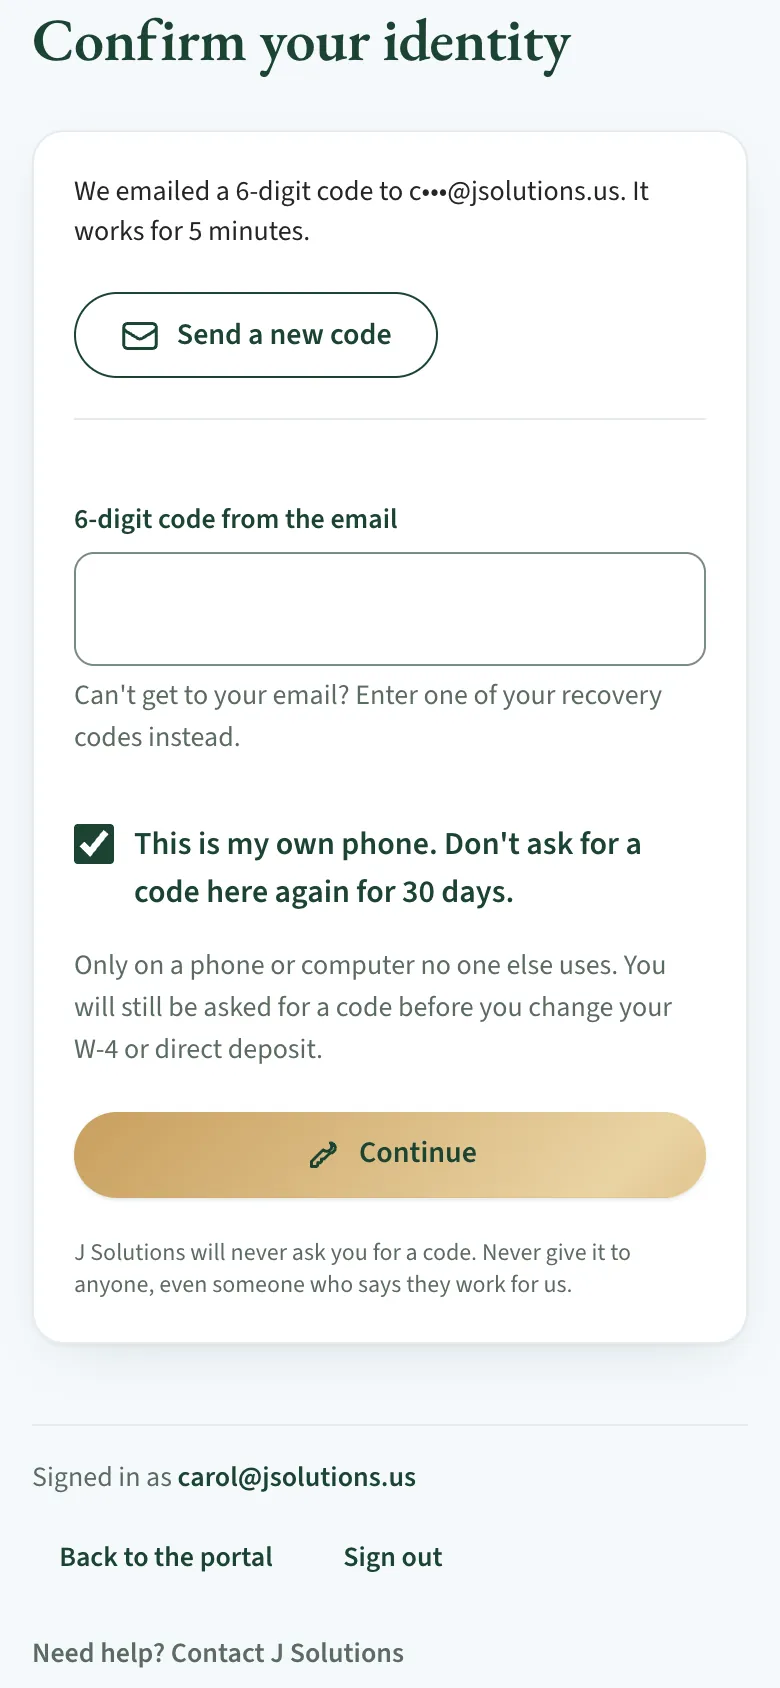
Next time: the 6-digit code
Each time you sign in and open My Pay, the portal asks once for a code.
- Codes by email: click Email me a code, then type the code from the email. Codes from an app: open the app and type the code it shows. Then click Continue.
- This is my own phone: tick it only on a phone or computer no one else uses. My Pay then opens there without a code for 30 days. You are still asked for a code before you change your W-4 or direct deposit.
- Can't get a code? Type one of your recovery codes in the same box, or contact J Solutions to reset your two-step sign-in.
Good to know: When a device is remembered, or the way you get codes changes, we email you. If it wasn't you, change your password and contact J Solutions.
My Pay · Step 22 of 30
On your phone
Everything works in your phone's browser. The menu is a bar at the bottom: My Documents, My Pay and Company. Each pay stub is one block with its Download button.
- The round button with your initial, top right, opens Account settings, Sign out and Need help? Contact J Solutions.
- To open it like an app, add it to your phone's home screen. The first time you open the portal on a phone, a box shows how (on an iPhone: Share, then Add to Home Screen); Got it or Not now hides it.
W-4 and direct deposit · Step 23 of 30
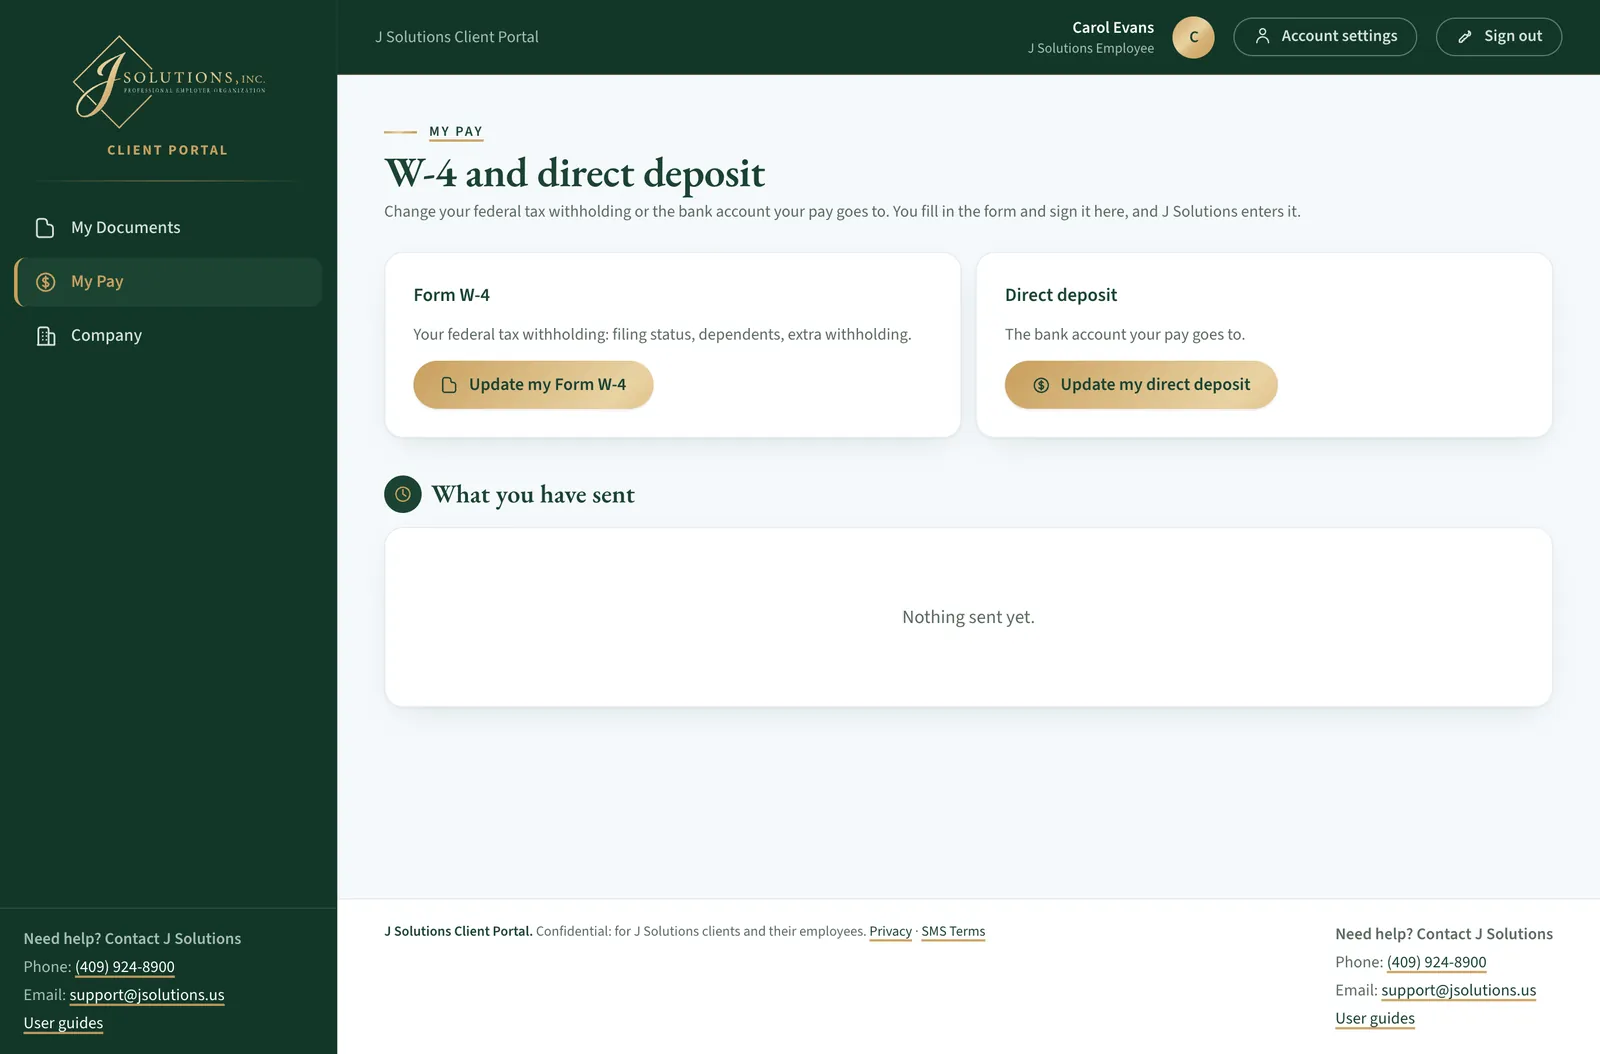
Update your W-4 or direct deposit
In My Pay, click Update my W-4 or direct deposit. You fill in the form and sign it here, and J Solutions enters it.
- Update my Form W-4 changes your federal tax withholding. Update my direct deposit changes the bank account your pay goes to.
- What you have sent lists your changes, with Received until J Solutions enters them, then the date they were entered.
- After you send a change, you get a confirmation email.
W-4 and direct deposit · Step 24 of 30
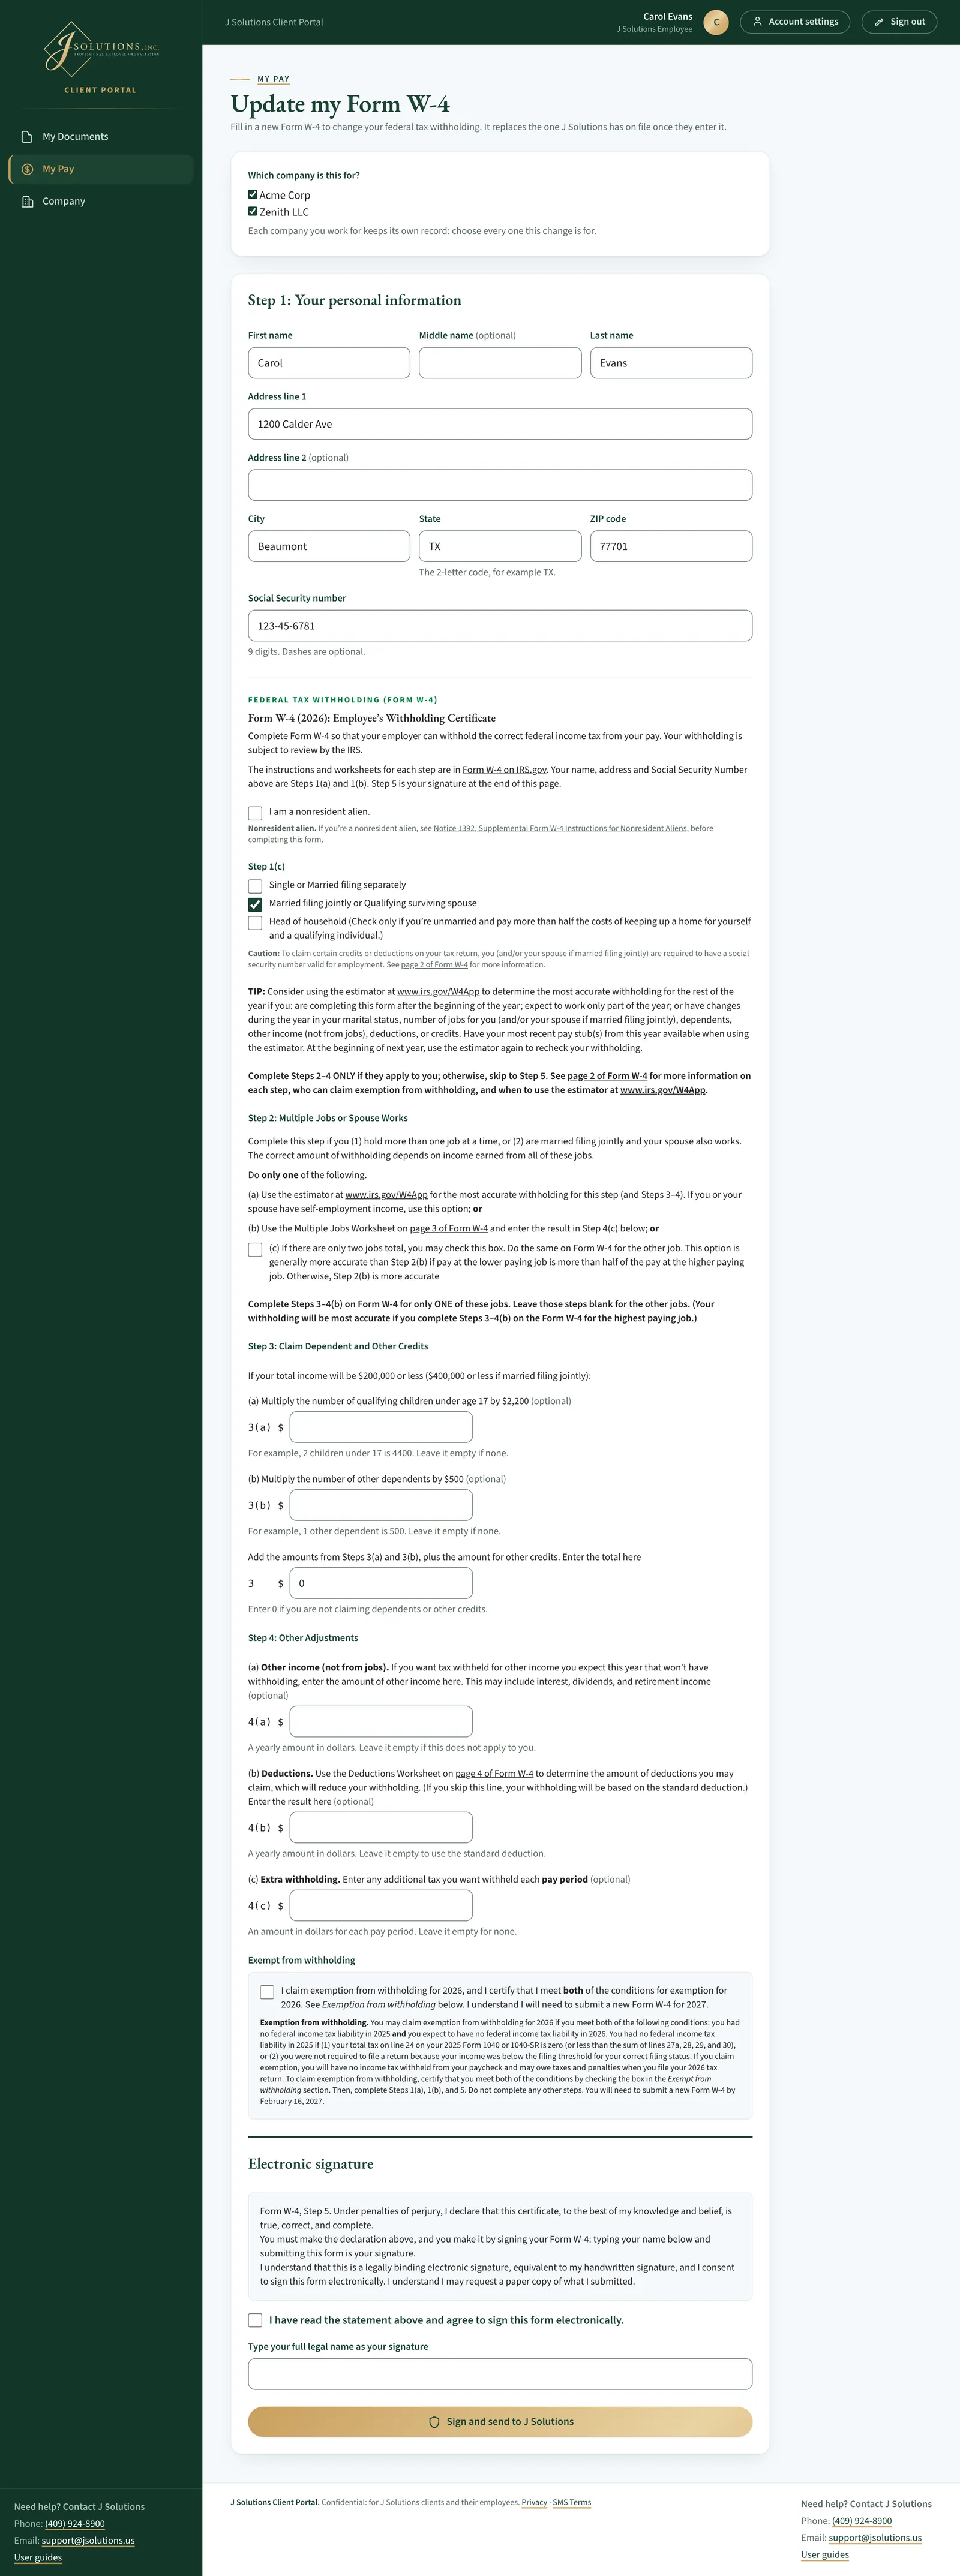
A new Form W-4
Update my Form W-4 opens a new Form W-4. It replaces the one J Solutions has on file once they enter it.
- If you work for more than one company, tick each one under Which company is this for?
- Fill in Step 1: Your personal information, including your Social Security number, then the form's steps as on your first W-4. The Step 3 total is required: enter 0 if you are not claiming dependents or other credits.
- Under Electronic signature, tick the box, draw your signature in the box, type your full legal name below it and click Sign and send to J Solutions. Both are needed.
W-4 and direct deposit · Step 25 of 30
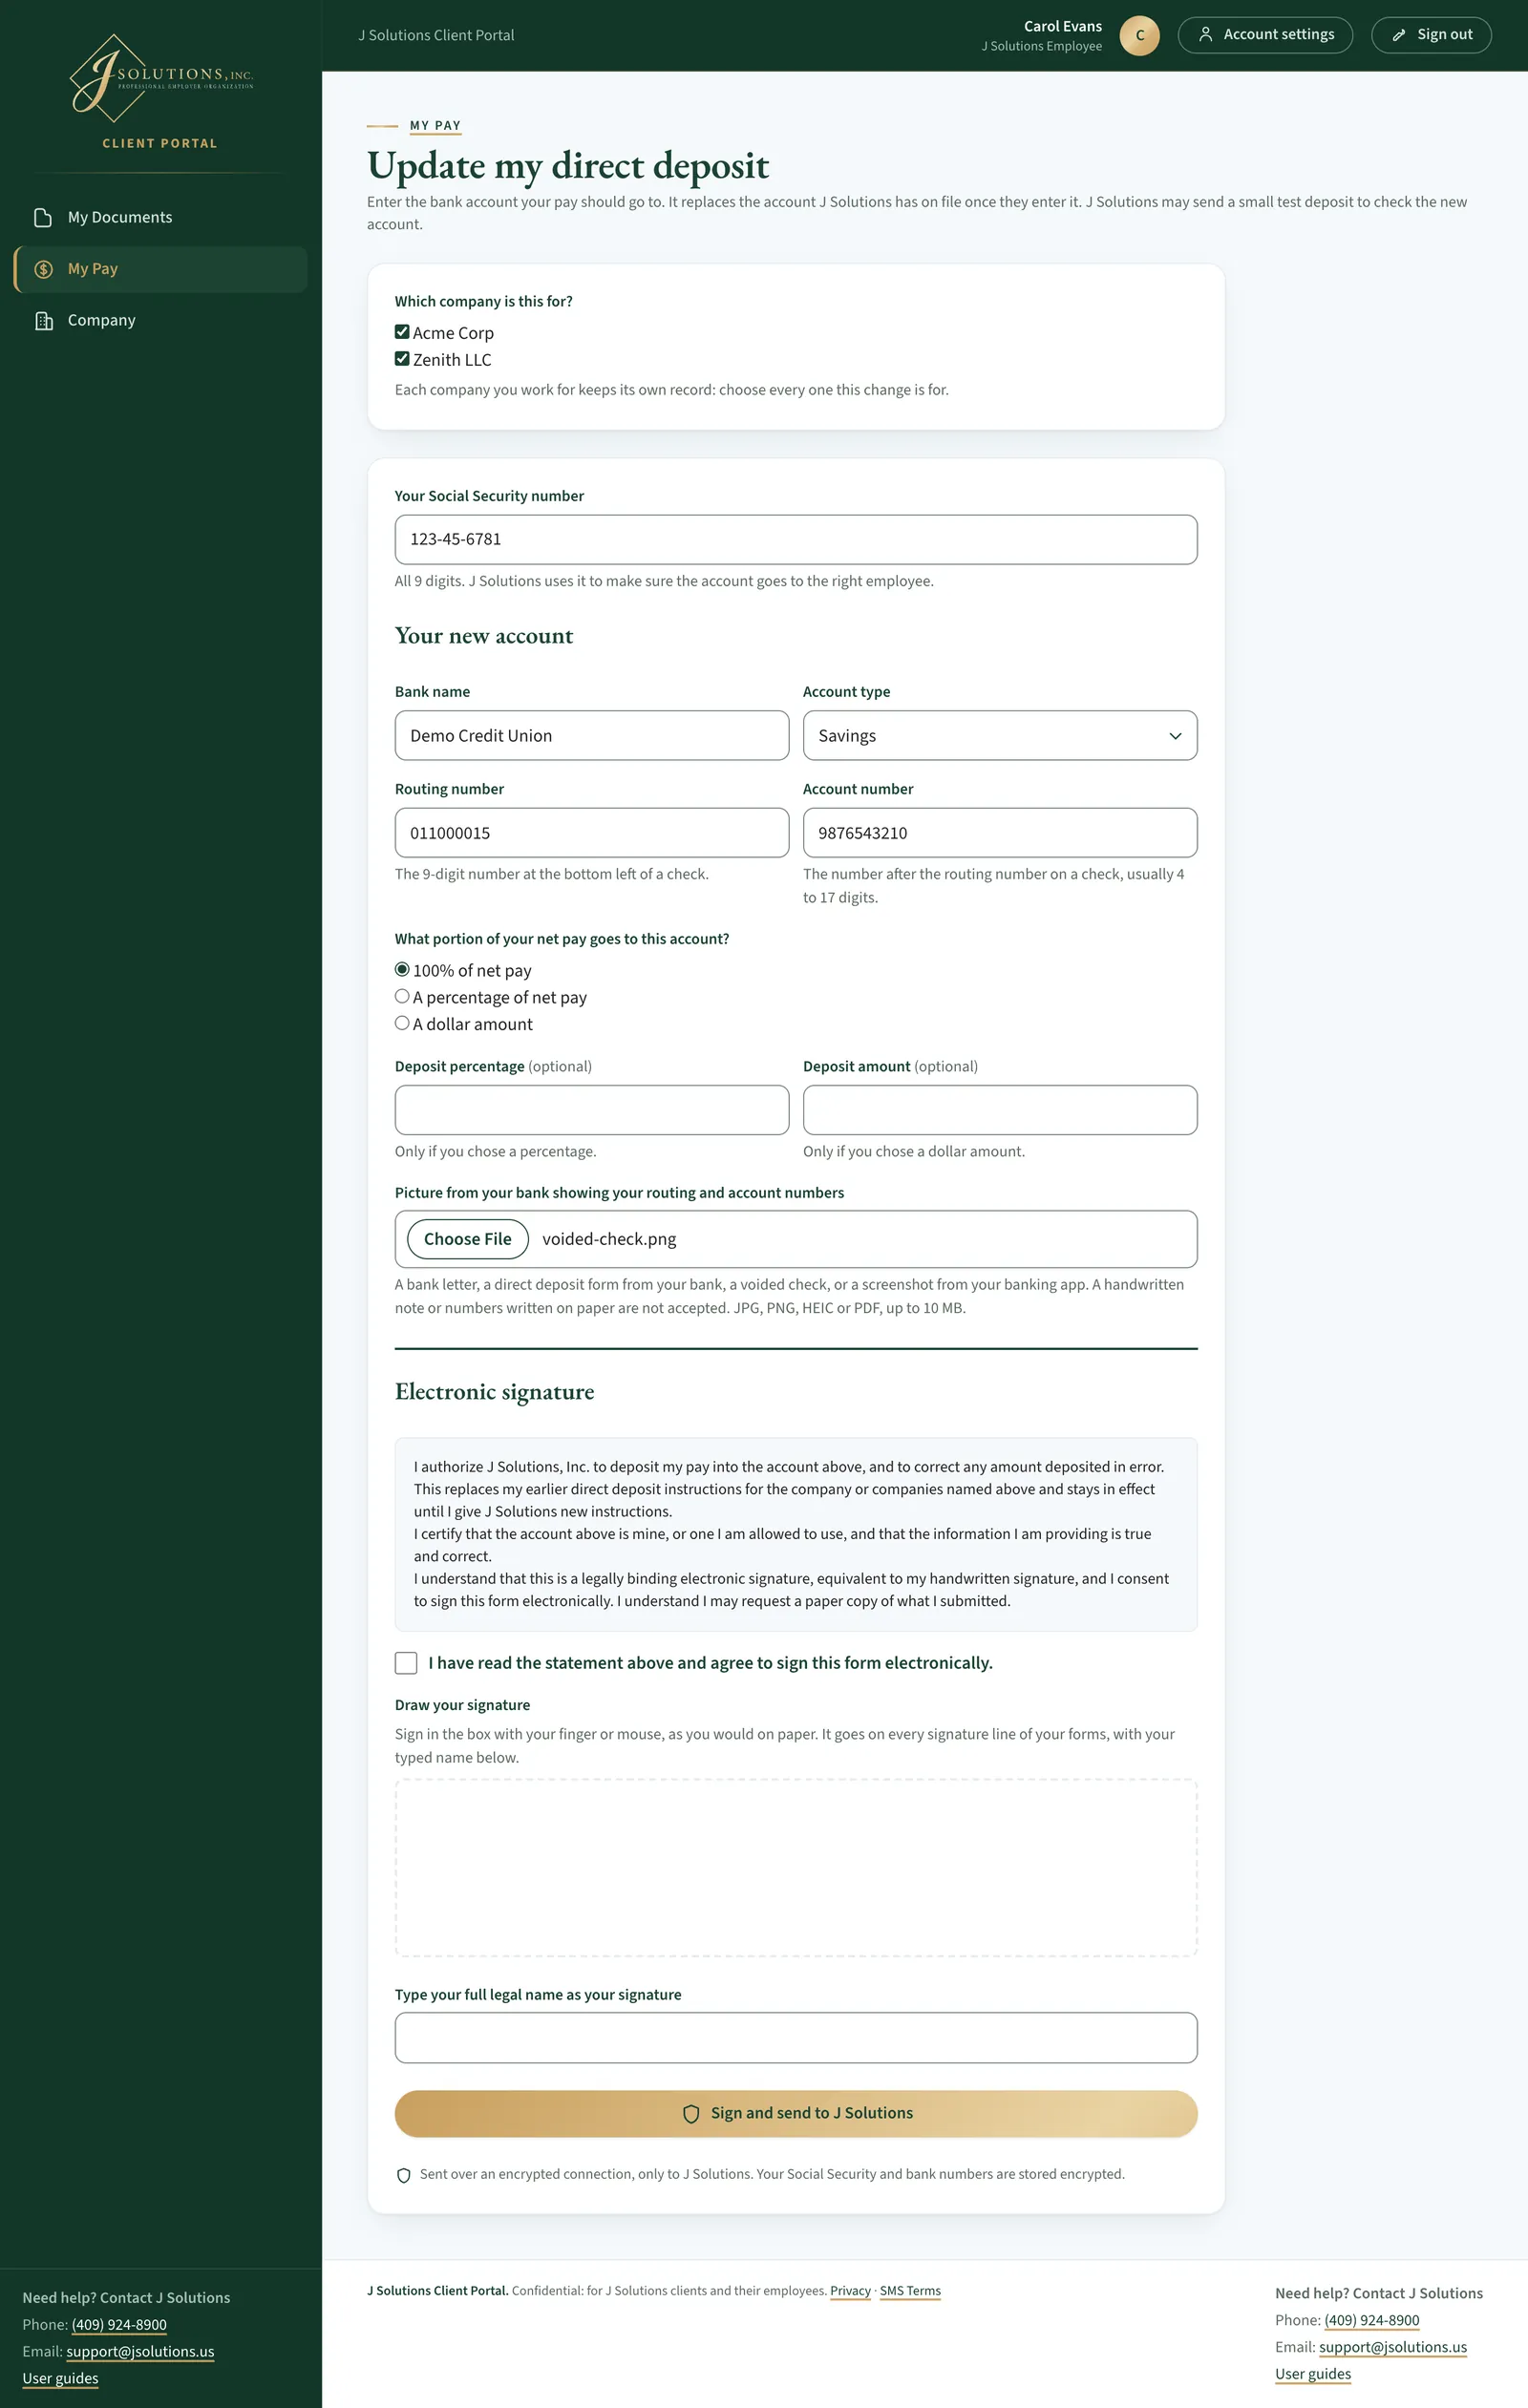
A new direct deposit account
Update my direct deposit asks for the account your pay should go to. Every part is required.
- Enter your Social Security number, all 9 digits, so J Solutions knows the account is yours.
- Enter the bank name, account type, routing number and account number.
- Under What portion of your net pay goes to this account?, choose 100% of net pay, A percentage of net pay or A dollar amount, and fill in the matching box.
- Add a picture from your bank showing your routing and account numbers: a bank letter, a voided check or a screenshot from your banking app.
- Sign as for the W-4 and click Sign and send to J Solutions.
Good to know: J Solutions may send a small test deposit to check the new account. The next step shows what to do.
Test deposit · Step 26 of 30
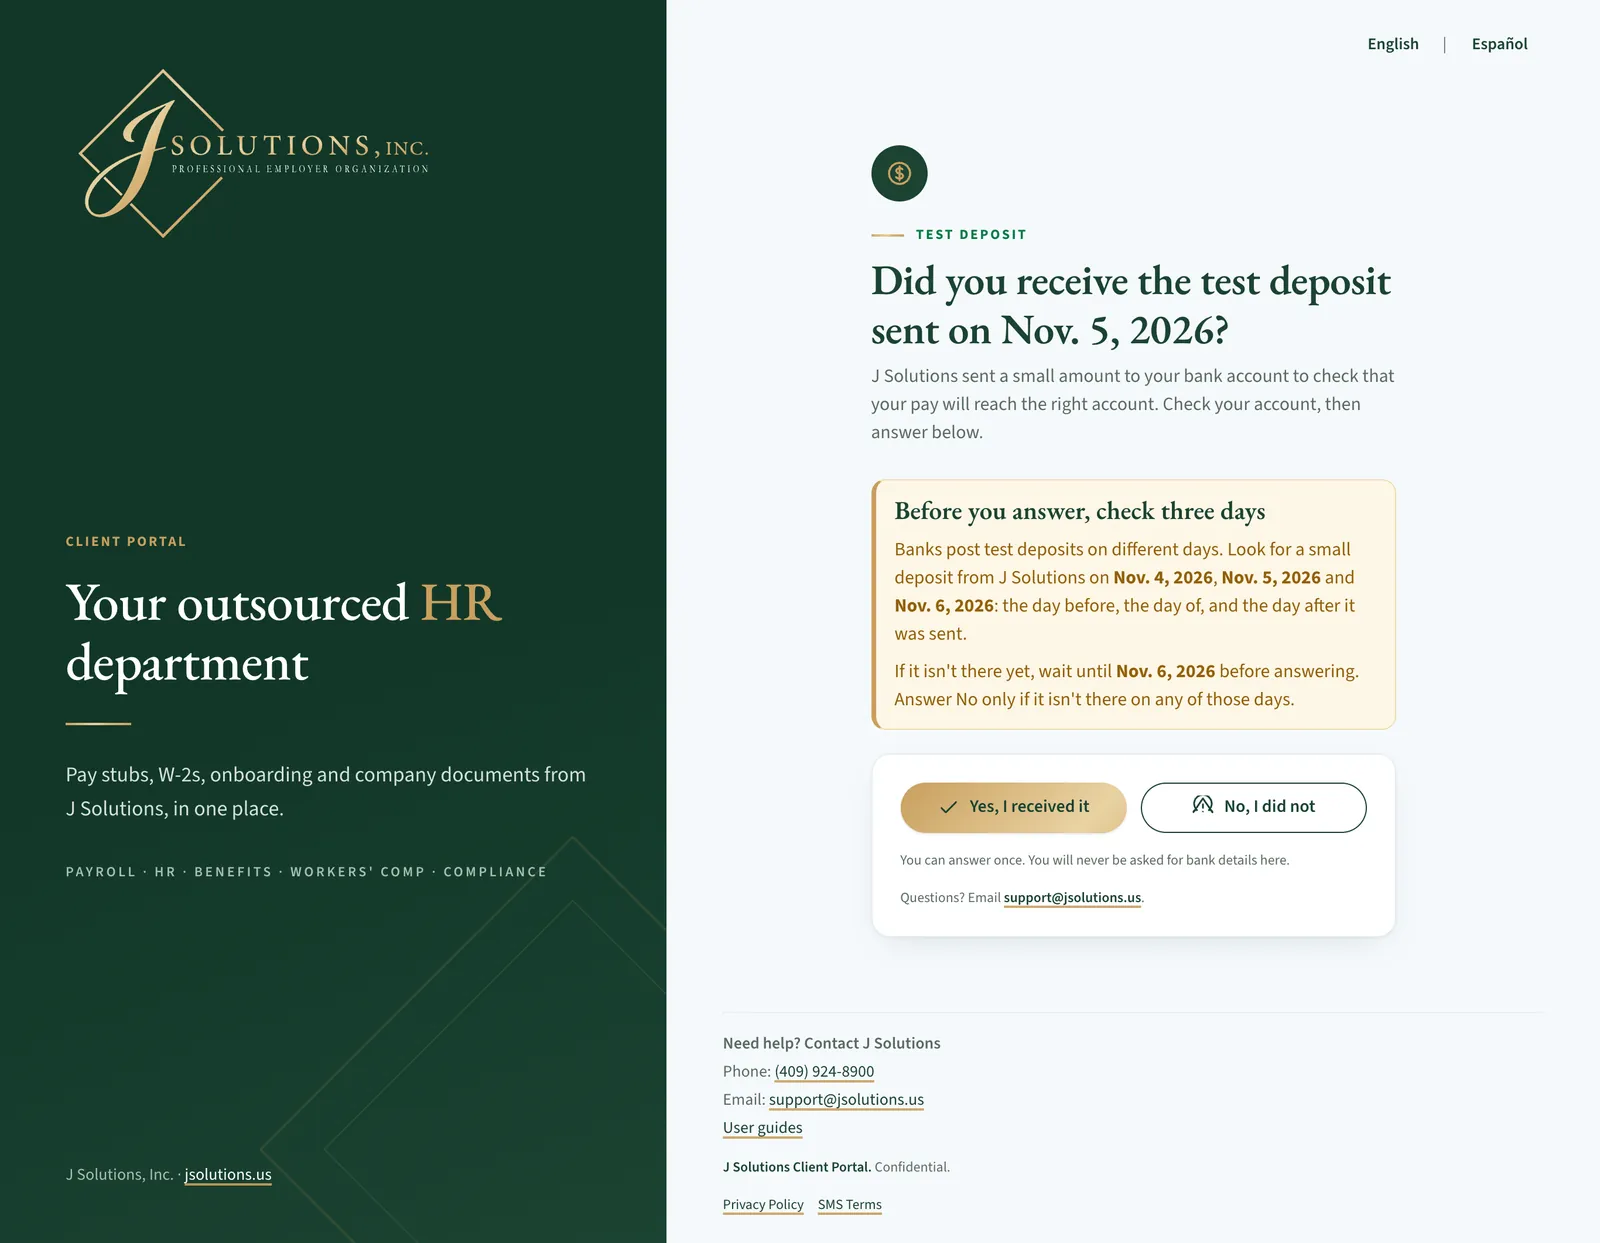
Did your test deposit arrive?
When J Solutions sets up your direct deposit, it may send a small test deposit to check that your pay will reach the right account. You then get an email: "Did you receive a test deposit from J Solutions?"
- The email and the page start with a box, Before you answer, check three days. It names the business day before the deposit was sent, the day it was sent and the business day after (weekends and bank holidays don't count). Banks post test deposits on different days, so look for it on all three.
- Then click Answer Yes or No in the email. On the page, click Yes, I received it or No, I did not. You do not need to sign in, and you are never asked for bank details.
- The link works once, for 7 days. If the deposit isn't there yet, wait until the last of the three days before answering.
Good to know: Not expecting the email? Contact J Solutions directly rather than using the link.
Test deposit · Step 27 of 30
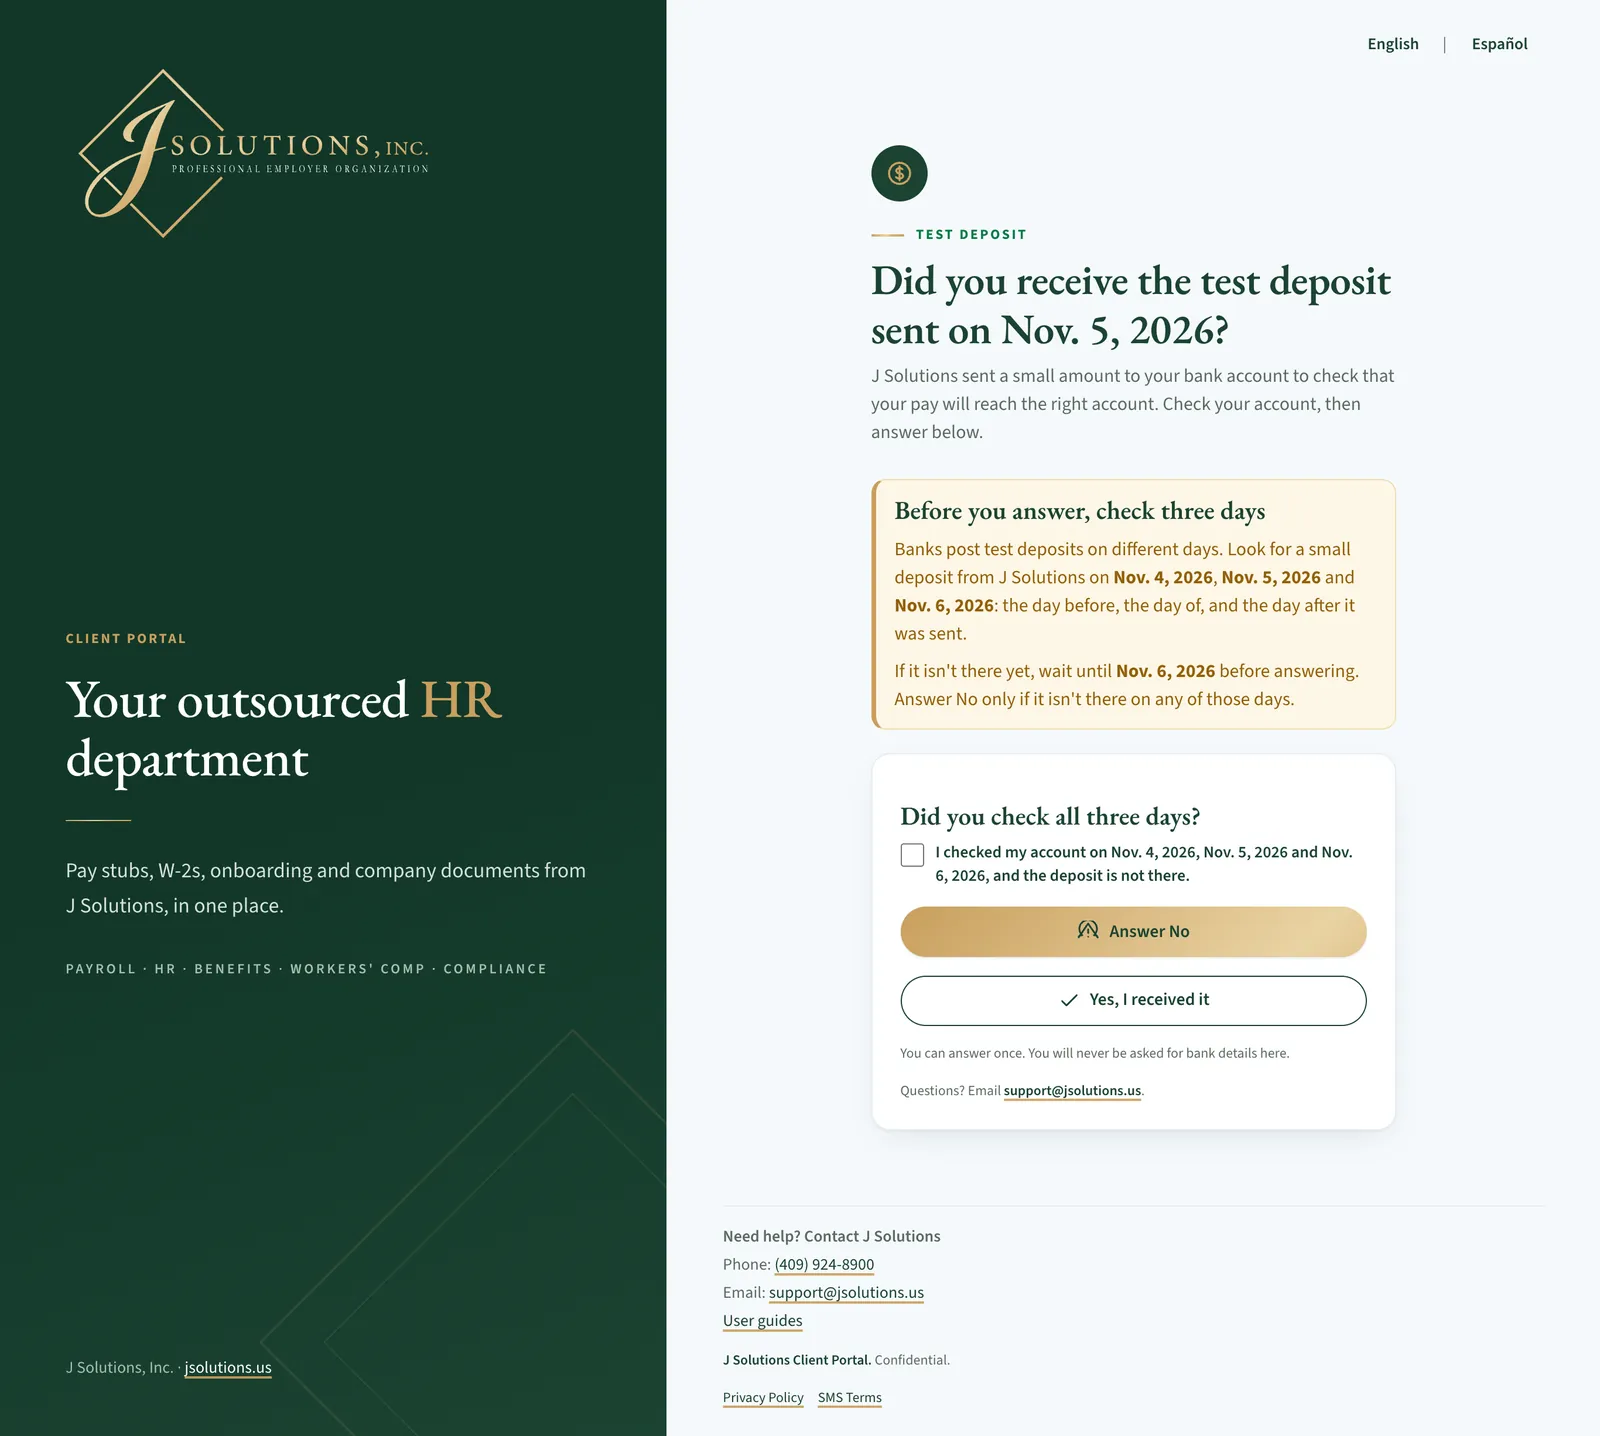
Answering No
No, I did not asks one more thing first: Did you check all three days? Nothing is sent to J Solutions yet.
- Tick I checked my account on the three days and the deposit is not there, then click Answer No.
- Found it after all? Click Yes, I received it instead.
- After a No, J Solutions checks your bank details and contacts you before your next pay.
Your account · Step 28 of 30
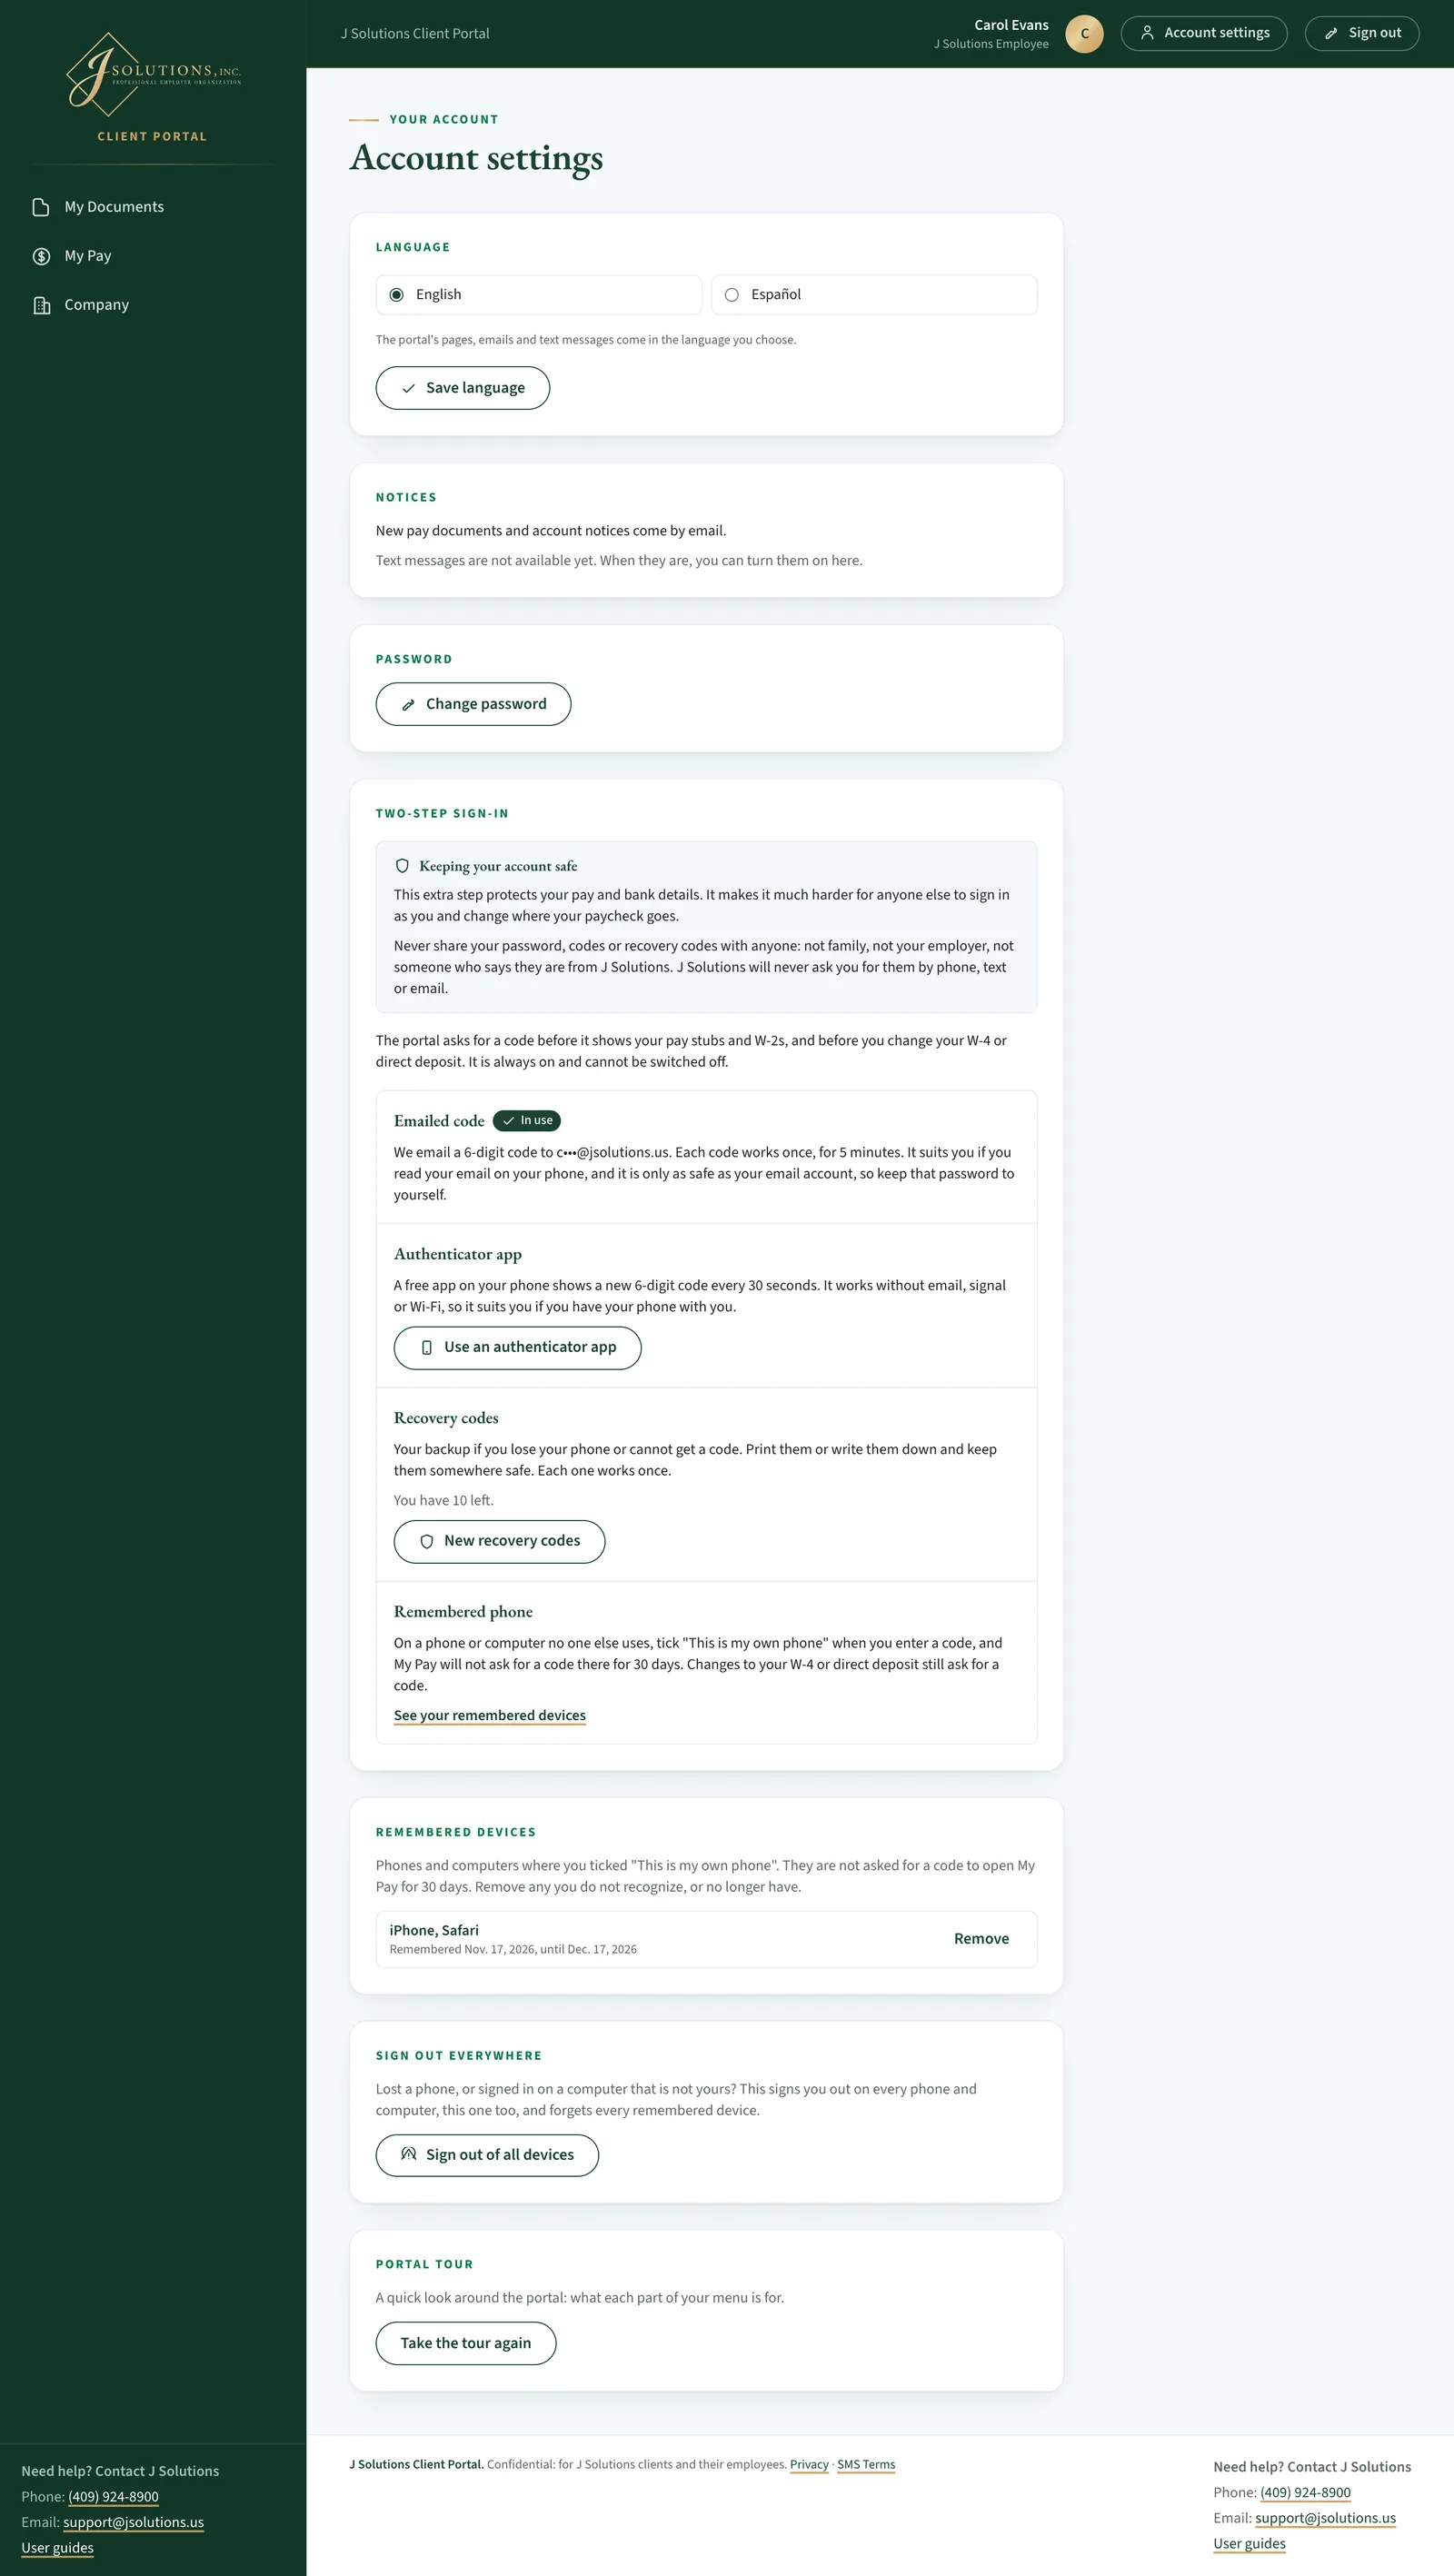
Account settings
Account settings is at the top right on a computer, or behind the round button with your initial on a phone.
- Language: choose English or Español and click Save language.
- Notices: new pay documents and account notices come by email. Text messages are not available yet.
- Password: Change password.
- Two-step sign-in says why the extra step matters and when the portal asks for a code. Below, each way you may use, with a short note on when it suits you. The one you use now is marked In use.
- Emailed code (if your company allows it) and Authenticator app: click Get codes by email or Use an authenticator app on the other one to switch (next step).
- Recovery codes: your backup if you lose your phone, with how many you have left. New recovery codes replaces them (the old ones stop working).
- Remembered phone: how This is my own phone works, and a link to your remembered devices.
- Remembered devices lists the phones and computers where you ticked This is my own phone, with the one you are using marked this device. Click Remove on any you do not recognize or no longer have: it is asked for a code again.
- Sign out of all devices signs you out everywhere, this device too, and forgets every remembered device. Use it if you lose a phone or signed in on a computer that is not yours.
- Portal tour: click Take the tour again to see the first-visit tour again.
Good to know: For your security, you are signed out after 30 minutes without activity once you have opened My Pay, including your W-4 and direct deposit changes (60 minutes otherwise). Two minutes before, a box asks if you want to Stay signed in.
Your account · Step 29 of 30
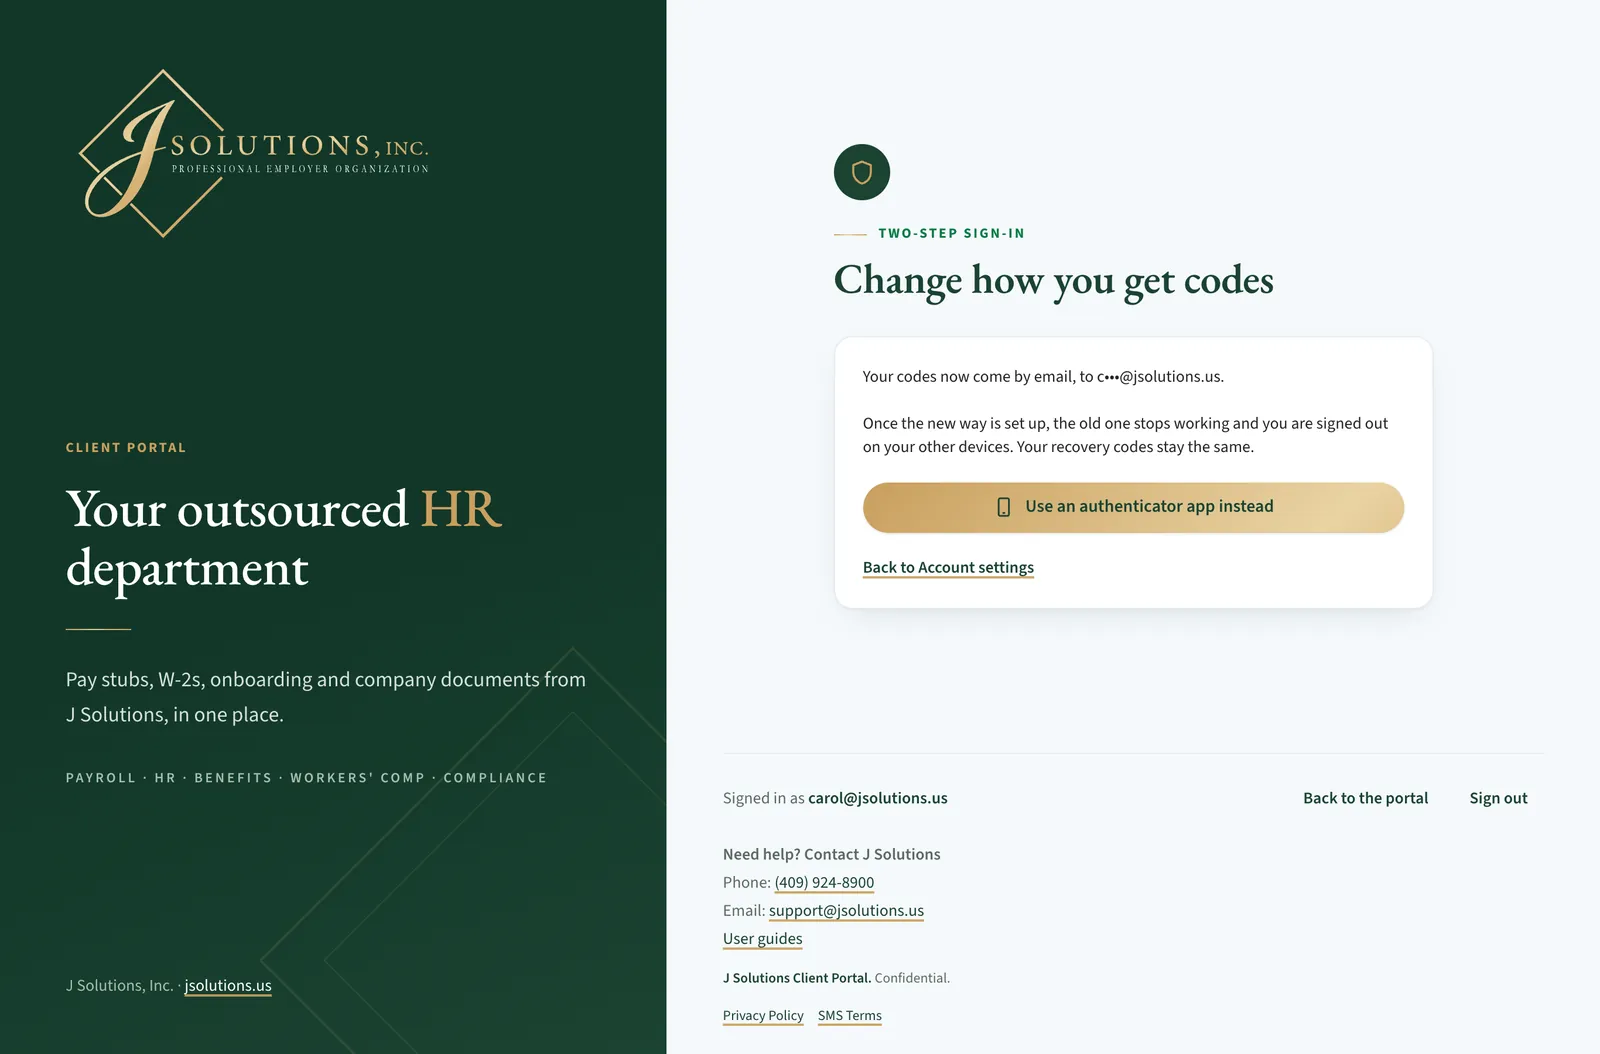
Change how you get codes
Get codes by email or Use an authenticator app under Two-step sign-in on Account settings opens this page. You first enter a code, as a security check.
- Click Use an authenticator app instead or Get codes by email instead, then set the new way up as on your first visit.
- Once the new way is set up, the old one stops working and you are signed out on your other devices. Your recovery codes stay the same.
- We email you when it changes.
Help · Step 30 of 30
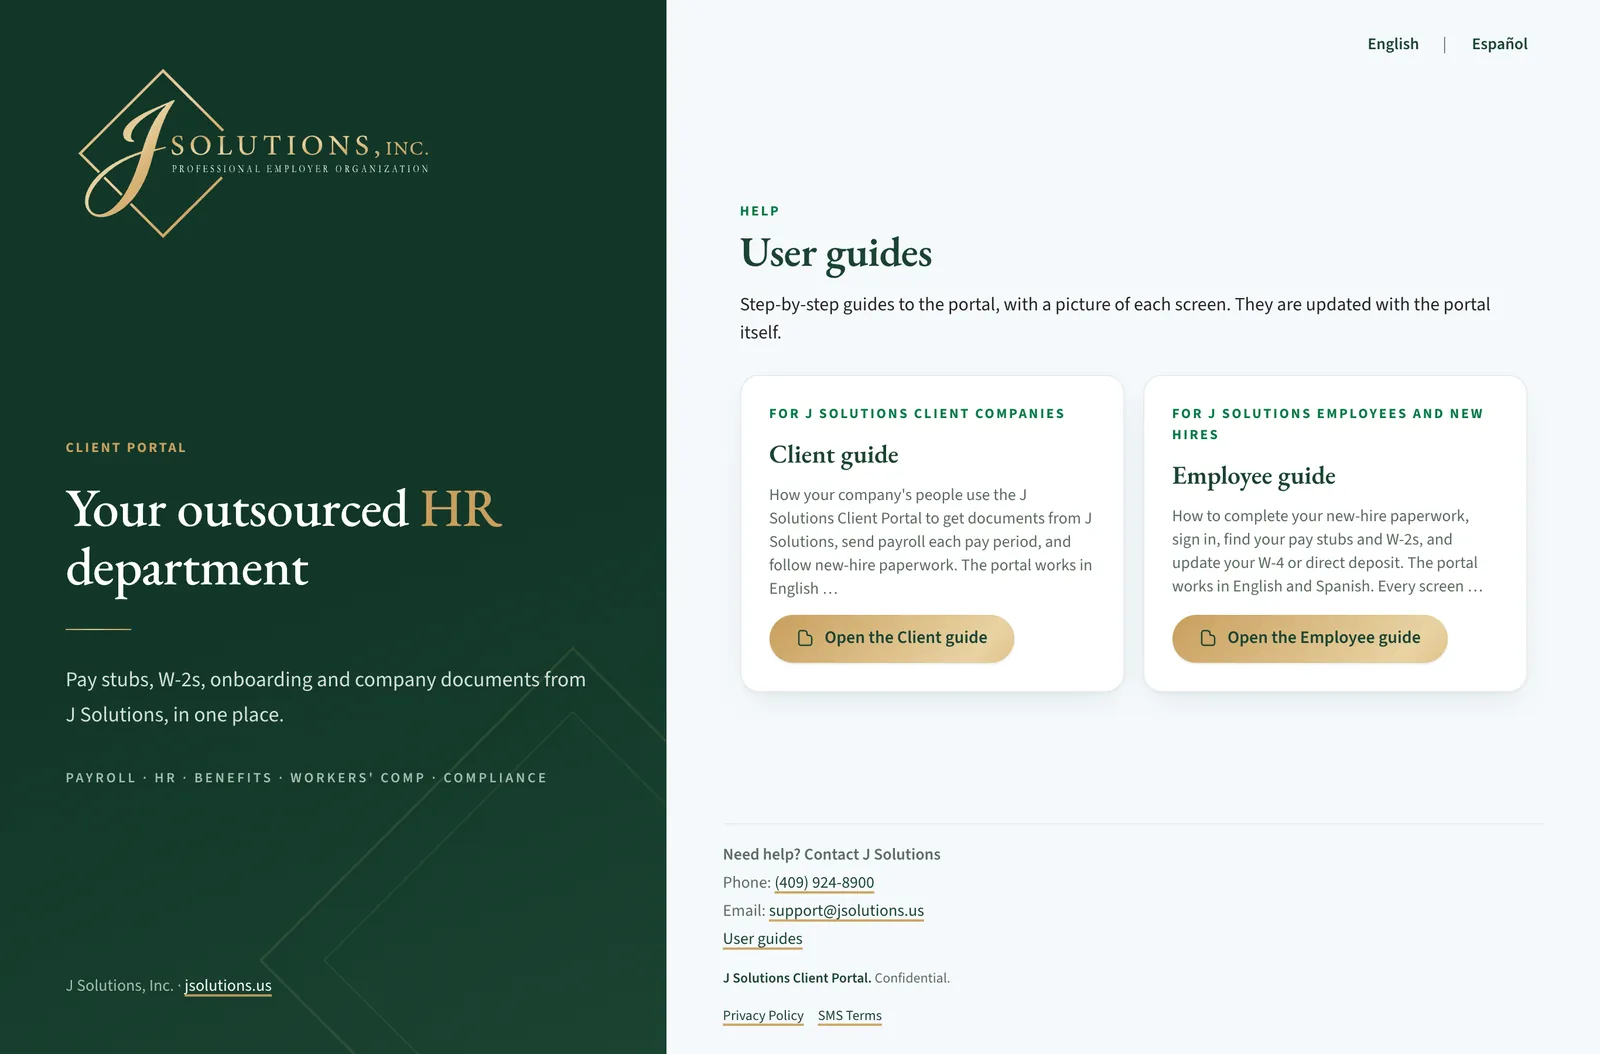
User guides
Every page has a Need help? Contact J Solutions block with J Solutions' phone number, email address and a User guides link.
- You can read this guide without signing in, from the sign-in page too, for example before your account is set up or if you are stuck on your password.
- Tap or click a screenshot to see it full size.
Need help?
- Portal address: https://portal.jsolutions.us
- Questions about your account or pay documents: support@jsolutions.us or (409) 924-8900. The same details are in the Need help? block on every page.
- J Solutions will never ask for your password or a sign-in code.